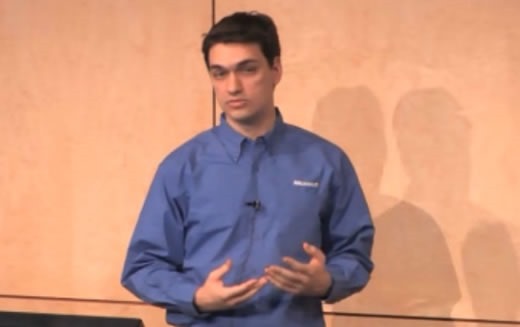
Guess who’s back?

A little while ago, I wrote about Benjamin Herila.

Two months ago, however, Ned Pyle gave an answer to a Server Core-related question. His advice was to contact Andrew Mason. I laughed out loud, but Ned was more up to date with current affairs than I was at that point.

After two years at Amazon, Andrew Mason decided to return to Microsoft.


I met Andrew at IT/DEV Connections in Las Vegas last week.

About Andrew Mason

It was a fun reunion. Andrew told me he rejoined Microsoft because the company and its strategies are still close to his heart. Bear in mind; Andrew has worked for Microsoft for many years before he plunged into his Amazon adventure…

Andrew is now working as a Principal Program Manager, focusing on Nano, this time around. He’s still very driven on untangling spaghetti code, and still very passionate at making Windows lean and mean.

His team is not a big team, but neither was his Original Server Core team back in the days. Andrew is a people-person and from his stories, most of his work is to make Program Managers from other teams make their teams deliver on the promises of lean and mean Windows. Yes, that’s called ‘Nano Server‘, these days, but don’t expect a finish line for these initiatives any time soon.

Personal note

Personally, I feel that Andrew is a great asset to Microsoft. It would be a waste if Microsoft would decide to let him go, but Andrew assured me that he won’t be leaving himself, any time soon.

My Server Core April Fools’ Day Prank

We are rapidly closing in on April 1st and, as a Server Core afficianado, I can’t resist playing a practical joke on my colleagues managing our Server Core installations. Inspired by the Scripting Guy blogpost yesterday, I’ll disable all network adapters using the following PowerShell Oneliner:

Get-NetAdapter | Disable-NetAdapter -Confirm:$false

I’ll be running these commands via remote block execution pointing to a couple of Server Core installations offering non-vital and redundant services.  Since we have monitoring, it’ll be interesting to see in what manner and timeframe my colleagues will be able to solve the riddle of their servers falling off the network. Luckily, it’s been a while since anything happened to these hosts, but that is to be expected when you go Server Core.

Some Active Directory Domain Controllers, that second DHCP server, perhaps that second issuing Certification Authority, but certainly the Windows Server Update Services (WSUS) Server will see some action in one week’s time. *evilgrin*

Server Core installations now benefit from Windows Defender, too.

While I write this, Windows Server 2012 R2 is Microsoft’s latest and greatest Windows Server version.

I planned on writing a blogpost on all the new features, specific to Server Core, but decided that this one blogpost would suffice…


Server Core vs. Full Installations

Don’t get me wrong, though. Server Core installations offer tons of new features and I really advice you to check it out.

The point is, however, that, these days, Server Core installations aren’t that special anymore. Most of the Server Roles and Features are available for both Full installations and Server Core installations. Also, since Windows Server 2012, you can switch between Server Core and Full (and minumum shell) after installation, making for a really interesting story when admins don’t run Server Core installations.


Windows Defender

Which brings me to the one feature specific for Server Core installations in Windows Server 2012 R2. According to the What’s Changed in Security Technologies in Windows 8.1 page on Microsoft TechNet:

In Windows Server 2012 R2 and Windows 8.1, Windows Defender is available on Server Core installation options (without the user interface), and it is enabled by default.

Windows Defender is primarily intended for consumer and unmanaged PC scenarios, and most large organizations will want to use an enterprise antimalware solution such as System Center 2012 Endpoint Protection, which also includes support for ELAM.


Concluding

With Windows Defender built into Server Core installations, these installations are now more malware resistant from day 1.

Of course, when you decide to implement an anti-malware solution, like Microsoft’s System Center 2012 Endpoint Protection, the malware scanning part of Windows Defender will be disabled, until such time you uninstall the anti-malware solution (properly).

How to disable Password complexity on Server Core installations

I feel Microsoft is doing a great job when it comes to the default security of their products. I’m not the only one, as Microsoft attitude towards security and user-friendliness has even earned it kudos in the keynote of the Australian Linux Conf last week for its default SecureBoot implementations on OEM hardware.

However, many people struggle with the default password requirements in Windows Server. While it’s pretty easy to change the password requirements in Server with a GUI installations, it’s not that straightforward on Server Core installations. So, here’s a detailed how-to:

    • First, perform your Server Core installation and provide a complex password for the built-in Administrator account, when you’re prompted to do so after the initial installation. This password must meet the following requirements:
      1. Passwords cannot contain the user’s account name or parts of the user’s full name that exceed two consecutive characters.
      2. Passwords must be at least six characters in length.
      3. Passwords must contain characters from three of the following four categories:
        1. English uppercase characters (A through Z).
        2. English lowercase characters (a through z).
        3. Base 10 digits (0 through 9).
        4. Non-alphabetic characters (for example, !, $, #, %)
    • Now, while logged on as this user, open a command prompt.
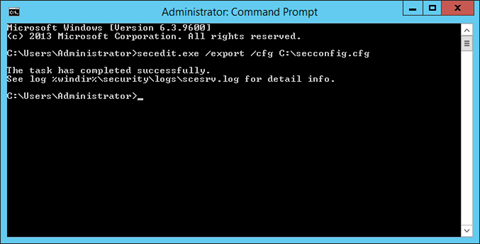
    • Type the following command:

secedit.exe /export /cfg C:\secconfig.cfg

Export the Security Configuration (click for original screenshot)

    • This will dump the security configuration settings of the local computer to the file C:\secconfig.cfg.
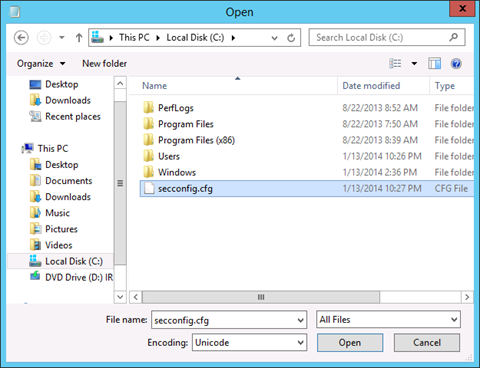
    • Open Notepad by typing Notepad.exe on the command prompt. In Notepad, use the Open… command from the File menu or Ctrl+O to open C:\secconfig.cfg. In the Open window, click on This PC in the left pane and then select Local Disk (C:). In the bottom right corner change the selection criteria from Text documents (*.txt) to  All Files.

Open the Security Configuration (click for original screenshot)

Now, select secconfig.cfg, double-click it or click Open.

    • In secconfig.cfg we’re going to need to change the value for PasswordComplexity from 1 to 0. Scroll down, until you get to the line that reads PasswordComplexity = 1. Change the 1 to 0. Of course, you can also use Ctrl+F to find it. When you’re really lazy (like I am), you can also deploy a straight Ctrl+H to replace PasswordComplexity = 1 to PasswordComplexity = 0.

Tip!
When you also dislike the passwords of accounts expiring, you can also configure that here. Looking to enable the guest account? Go ahead.

    • When done, use the Save command from the File menu to save the new settings to the file. Next, close Notepad by either clicking on the red tab in the top right corner of the application or by pressing Alt+F4.
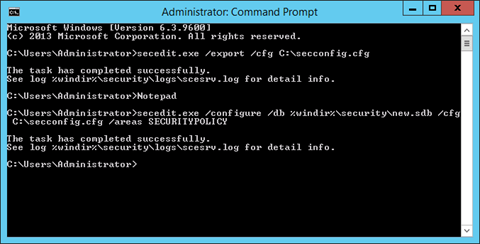
    • To load the edited file as your new security configuration, use the following command:

secedit.exe /configure /db %windir%\securitynew.sdb /cfg C:\secconfig.cfg /areas SECURITYPOLICY

Apply the Security Configuration (click for original screenshot)

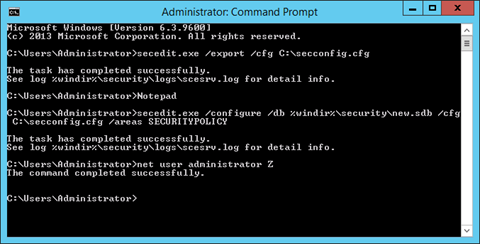
    • The new Security configuration will apply to all password changes and new password. So, you can change the password for the built-in administrator to whatever you like:

net user .\administrator Z

Change the password for the built-in Administrator account (click for original screenshot)

In the example above, we’ve given the password ‘Z’ to the administrator. Glimlach


Further reading

Windows Web Server 2008 R2 Server Core local password complexity
HOWTO: Disable complex password policy on Hyper-V Server 2008?
Disable complexity password on Windows 2008 Server Core

Statistics on 2013

As an avid Server Core fan, I though you might be interested on the topics that were most read on this blog in 2013…

So here goes:

  1. How to install a Server Core R2 Domain Controller
  2. How to disable the Windows firewall on Server Core installations of Windows Server 2012 and Hyper-V Server 2012 
  3. Switching between the four GUI layers in Windows Server 2012 with PowerShell one-liners
  4. Switching between GUI modes in Windows Server 8 
  5. KnowledgeBase: Errors connecting to Windows Server 2008 R2 or Windows Server 2012 Device Manager remotely 
  6. Fun with FSMO roles and functional levels on Server Core Domain Controllers 
  7. Get your Server Core Freak on! 
  8. Updating Server Core and Swithing GUIs 
  9. What would you choose? Flexibility vs. Disk space 
  10. Running into vague errors in Windows Server 2012 Server Core but not in Server with a GUI installation? Here’s one solution 

See you in 2014!

Upgrade your Windows Server 2012 R2 RTM Server Core Installs

Today, Microsoft has made Windows Server 2012 R2 available to the public.

It’s no longer the fortunate TechNet and MSDN subscribers and Volume Licensing Service Center (VLSC) aficionados who have Windows Server 2012 R2 RTM Server Core bragging rights:

Now everyone and their moms gain access to Microsofts latest and greatest Windows Server product family (and its System Center cousins).

For those of you who have been playing with Windows Server 2012 R2 RTM and Hyper-V Server 2012 R2 RTM since they became available, it’s important to upgrade your Server Core installations from the Release to Manufacturers (RTM) version to the General Availability (GA) version.

For this, you’ll need to download and install these two Windows Server updates:


You can easily install these updates through Server Configuration (sconfig.cmd), option 6) Download and Install Updates.

Enjoy! Glimlach

Get your Server Core Freak On!

When you’re a current TechNet and/or MSDN subscriber, you’re in luck today!

Microsoft has made the Release to Manufacturers (RTM) bits for Windows Server 2012 R2 and Hyper-V Server 2012 R2 available to current TechNet and/or MSDN subscribers.

Here’s the info:

  • Microsoft Hyper-V Server 2012 R2 (x64) – DVD (English)
    en_microsoft_hyper-v_server_2012_r2_x64_dvd_2708236.iso    
    1917 MB
    SHA1 1EEC2EE8DD77E8EB970B210C9B0E01986D7210DD
      
  • Windows Server 2012 R2 (x64) – DVD (English)
    en_windows_server_2012_r2_x64_dvd_2707946.iso
    4071 MB
    SHA1 B6F063436056510357CB19CB77DB781ED9C11DF3


Enjoy! Smile

Server Roles in Windows Server 2012 Server Core

WebYou might be interested in working with the available Server Roles in Server Core installations of Windows Server 2012.

While you can always install Windows Server 2012 as a Full Installation, you will not gain all the benefits of having it installed as a Server Core installations. Among other things, the sources to pile on the Graphical User Interface (GUI) are still present on a previously converted installation. That’s why I wrote a series on implementing and managing Server Roles on Server Core installations of Windows Server 2012, natively.

I’ve posted this series on 4sysops.com, the free resource for Windows Administrators. You can find all 12 posts through the links below:

  1. Looking at available Server Roles in Windows Server 2012 Server Core
  2. Configuring a Windows Server 2012 Server Core installation as an Active Directory Domain Controller
  3. Configuring a Windows Server 2012 Server Core installation as a DNS Server
  4. Configuring a Windows Server 2012 Server Core installation as a DHCP Server
  5. Configuring a Windows Server 2012 Server Core installation as a File Server
  6. Configuring a Windows Server 2012 Server Core installation with Active Directory Certificate Services 
  7. Configuring a Windows Server 2012 Server Core installation as a Print Server
  8. Configuring a Windows Server 2012 Server Core installation as a Remote Access Server with RRAS, DirectAccess and Routing
  9. Configuring a Windows Server 2012 Server Core installation as a Hyper-V Host
  10. Configuring a Windows Server 2012 Server Core installation as a Web Server
  11. Configuring a Windows Server 2012 Server Core installation as a FTP Server
  12. Configuring a Windows Server 2012 Server Core installation as a Windows Server Update Server (WSUS)

Enjoy! Smile

Meet the new Server Core Program Manager!

When I took my first steps with Server Core installations, I met the Principal Program Manager for Server Core within Microsoft at its TechEd event: Andrew Mason.

Andrew is responsible for all the work done in the Server Core area, wrote at the Server Core blog, supplied answers on the TechNet Forums, and presented several times on the benefits of using Server Core installations compared to Full installations. Andrew is also responsible for making Server Core the default installation option in Windows Server 2012.

A while ago, I noticed Andrew wasn’t with Microsoft anymore.

After some investigation, I found out Andrew is now working with Amazon, apparently following the path laid out by Steve Riley and Jesper Johansson. Of course, I wish him the best of luck!

It also leaves the question on who’s the Program Manager for Server Core today unanswered…

Well. That question didn’t last long unanswered, since I met the Program Manager for Server Core last month, during a special MVP party at the balcony of the Palacio de Cibiles in Madrid during TechEd Europe 2013.

Benjamin Herila

Benjamin Herila

Not only is Benjamin currently leading the team improving on Server Core functionality in Windows Server. He also is the guy that wrote the Get-DisplayResolution and Set-DisplayResolution PowerShell Cmdlets and the underlying setres.exe executable. These bits allows us to easily change the display resolution on the command line in both Server Core and Full installations of Windows Server 2012 and beyond.

So why is this important?

If you want to keep up to date with Server Core (or any featureset of a Microsoft product), it’s good to have the name of the Program Manager, since this is the person responsible for most of the communication around the featureset and most of the presentations at both internal and external Microsoft events.

For instance, one of Benjamin’s presentations is already available online through Channel 9. Also, the last five posts on the Server Core blog have been written by Benjamin.

So, when you attend a Microsoft event and are looking for Server Core presentations, pick Benjamin Herila from the speaker list and go see his presentation(s)!

On the TechNet Forums, Benjamin has already supplied answers on several questions, related to the work his team does. It’s not just Server Core, but also Windows Server Update Services (WSUS). If you see an answer from Benjamin, you’ll know it’s the definitive answer.

Cheers, Benjamin! Martini glass

KnowledgeBase: Server Core Web Servers are not manageable remotely by default

Pre-Web-iconIn Windows Server 2012 and Windows 8, Server Manager can be used to remotely manage both Full Installations and Server Core Installations of Windows Server 2012.

Tip!
To gain access to the Server Manager functionality in Windows 8, install the Remote Server Administration Tools package. Next, you can use the Start Screen to search for the Administrative Tools folder. You will find a shortcut to Server Manager in this folder.


One of its features is the ability to install and uninstall Server Roles and Features remotely. This is extremely helpful in scenarios where you’d want to install multiple servers with the same Server Role at once (like the Web Server Role), but also when you’re managing Server Core installations, since Server Manager provides a graphical user interface (GUI) to make you easily achieve a lot of your configuration tasks.


The challenge

Many of the Server Roles available in Server Core can be installed and configured remotely. I know many admins like to use Server Manager and the Remote Server Administration Tools to manage their Server Core installations that way. Therefore, I find it a shame, that the Web Server Role cannot be installed to a basic configured state using the above method. Sad smile 

The Web Server Server Role can be installed on its own, but it is also installed when you install one of the next Server Roles in Windows Server 2012:

  1. FTP Server
  2. DirectAccess Server
  3. IP Routing
  4. Windows Server Update Services

When you try to connect with the Internet Information Services (IIS) Manager from a remote Windows Server 2012 installation, after you install the Web Server Role or any of the Server Roles above, you will be presented with an error message:
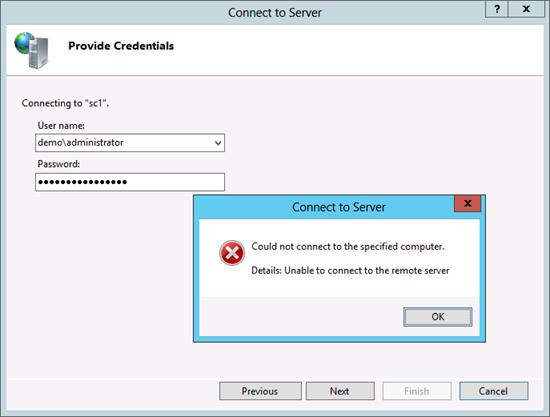
IISMgrUnableToConnect

The explanation

The root of the problem is, by default, when you install the Web Server Server Role on Server Core, the Web Management Service Role Service is not installed by default.

Security, Part 1

The reason Microsoft does not install the Web Management Service is this would mean a setback from a security perspective to the Windows 2000 Server days (where Internet Information Services were installed and enabled by default on each install). To be frank, not all Web Servers need a remote web management service, listening on management requests. Indeed, with access to the console, the many Internet Information Services-related PowerShell Cmdlets and, of course, the Web Platform Installer, remote management isn’t always needed.


To make things worse, even if you pay attention during the installation of the above Server Roles, you still wouldn’t be able to manage Web Servers remotely with the Internet Information Services (IIS) Manager, since the Web Management Service is not configured or started, by default.

Security, Part 2

Although the Web Management relies on authentication to be accessible and the communication between the Internet Information Services (IIS) Manager is encrypted (optionally), opening a management service listening on a TCP port is a bad idea for publicly connected machines. Therefore, the Web Management Service, by default, is not configured for remote management and its service is not running after installation.


This configuration can be done … wait for it… through the registry. Confused smile

You can perform these changes through Group Policy Preferences (for domain-joined Web Servers, FTP Servers, WSUS Servers, DirectAccess Servers and IP routers. Alternatively, you can use Remote Registry access or script the change with *.reg files through PSExec. Regedit.exe, however, is available on the command line of Server Core installation, so you can make this change on the console itself.

Of course, after a change, the Web Management Service (WMSVC) needs to be configured to start automatically and, then, started.


The solution

So, to manage a Web Server remotely, you will need to perform the following actions:

  1. Install the Web Management Service Role
  2. Configure the Web Management Service
  3. Configure the Web Management Service to start automatically
  4. Start the Web Management Service

Install the Web Management Service Role

Install the Web Management Service Role on your Server Core installation by either installing it through Server Manager on a Full Installation of Windows Server 2012.

To install the Web Management Service from the console of your Server Core installation, run the following PowerShell command:

Install-WindowsFeature Web-Mgmt-Service


Configure the Web Management Service

The Web Management Service can be configured through the Registry. Its settings are located in HKLMSoftwareMicrosoftWebManagementServer.

Simply start the Registry Editor on the console of your Server Core installation by typing regedit.exe, and change he value for EnableRemoteManagement from 0 to 1. Close RegEdit with Alt+F4 or by clicking the X symbol in the right top of the program.

Configure the Web Management Service to start automatically

Next, configure the Web Management Service for automatic start. Type the following command on the console of your Server Core installation:

sc config WMSVC start= auto


Start the Web Management Service

All we need to do now, is start the Web Management Service:

net start WMSVC


Concluding

Microsoft has gone to great lengths to make the Web Server as secure as possible. When you remotely manage Server Core-based Web Servers, however, you will hit some bumps on the way. This blogpost explains how to pass them