Active Directory

Server Roles in Windows Server 2012 Server Core

WebYou might be interested in working with the available Server Roles in Server Core installations of Windows Server 2012.

While you can always install Windows Server 2012 as a Full Installation, you will not gain all the benefits of having it installed as a Server Core installations. Among other things, the sources to pile on the Graphical User Interface (GUI) are still present on a previously converted installation. That’s why I wrote a series on implementing and managing Server Roles on Server Core installations of Windows Server 2012, natively.

I’ve posted this series on 4sysops.com, the free resource for Windows Administrators. You can find all 12 posts through the links below:

  1. Looking at available Server Roles in Windows Server 2012 Server Core
  2. Configuring a Windows Server 2012 Server Core installation as an Active Directory Domain Controller
  3. Configuring a Windows Server 2012 Server Core installation as a DNS Server
  4. Configuring a Windows Server 2012 Server Core installation as a DHCP Server
  5. Configuring a Windows Server 2012 Server Core installation as a File Server
  6. Configuring a Windows Server 2012 Server Core installation with Active Directory Certificate Services 
  7. Configuring a Windows Server 2012 Server Core installation as a Print Server
  8. Configuring a Windows Server 2012 Server Core installation as a Remote Access Server with RRAS, DirectAccess and Routing
  9. Configuring a Windows Server 2012 Server Core installation as a Hyper-V Host
  10. Configuring a Windows Server 2012 Server Core installation as a Web Server
  11. Configuring a Windows Server 2012 Server Core installation as a FTP Server
  12. Configuring a Windows Server 2012 Server Core installation as a Windows Server Update Server (WSUS)

Enjoy! Smile

How to disable the Windows Firewall on Server Core installations of Windows Server 2012 and Hyper-V Server 2012

FirewallFrom the first Server Core installations of Windows Server 2008 to my latest installation of Hyper-V Server 2012, I have struggled with the Windows Firewall. It is turned on by default after installation and this is a good thing. However, when you’re testing remotely managing Server Core installations of Windows Server 2012 and Hyper-V Server 2012, the Windows Firewall gets in the way fast.

As it turns out, the Windows Firewall can be turned off quite easily. Two methods exist:

  1. Disable the Windows Firewall from the command line
  2. Disable the Windows Firewall through Group Policy

Disabling from the command line

If you want to disable the Windows Firewall from the command line for a single server, PowerShell is the fastest and most reliable method. The following PowerShell one-liner will disable the Windows Firewall for all Firewall profiles:

Get-NetFirewallProfile | Set-NetFirewallProfile -enabled false


Disabling through Group Policy

Group Policy can be used to change settings on thousands of computers at once. To disable the Windows Firewall through Group Policy, follow these instructions:

  • Log on to a Domain Controller, or a management station that has the Group Policy Management Console (GPMC) installed with sufficient permissions to create and link Group Policy objects. (GPOs)
  • Start the Group Policy Management Console (GPMC)
  • Select an appropriate level where you want to apply the Group Policy Object (GPO), for instance the domain-level or an Organizational Unit (OU) and right-click it. Select Create a GPO in this domain, and Link it here… from the context menu. Give it a meaningful name and press OK when done.
  • Now select the newly created Group Policy Object (GPO) and right-click it. Select Edit… from the context menu. This will open the Group Policy Management Editor.
  • Open Computer Configuration, Policies, Windows Settings, Security Settings, Windows Firewall with advanced security. Here, open Windows Firewall with advanced security. In the right-hand pane, click on the hyperlink Windows Firewall Properties.  
  • Here, the tabs represent the Firewall profiles: domain, private and public. You can select the Firewall state for each of these profiles.
  • When done, click OK. Then, close the Group Policy Management Editor.

After the default background refresh has occurred, the firewall will be disabled on all computers in the scope of the Group Policy Object (GPO). If you don’t want to wait that long, you can run gpupdate on the computers you want to, or (when you’re using the Group Policy Management Console on Windows 8 or Windows Server 2012) you can right-click on the level where you applied the Group Policy Object (GPO) and select Group Policy Update… from the context-menu.

Upgrading a Windows Server 2008 R2-based Server Core Domain Controller or DNS Server to Windows Server 2012 hangs on blank screen

Server Core installations of Windows Server offer increased performance and higher availability, compared to their Full Installation and Minimal Shell couterparts. Once you get hooked on the idea of Server Core and have a couple of Server Core installations of Windows Server 2008 R2 running, you might even get the idea you can simply in-place upgrade them to Windows Server 2012.

In an ideal world you can, but unfortunately, due to a known issue, you cannot upgrade a domain controller that runs a Server Core installation of Windows Server 2008 R2 to a Server Core installation of Windows Server 2012. The issue is described in Microsoft Knowledgebase article 2734222.

The upgrade will hang on a solid black screen late in the upgrade process. Rebooting such DCs exposes an option in boot.ini file to roll back to the previous operating system version. An additional reboot triggers the automatic rollback to the previous operating system version.

Until a solution is available, it is recommended that you install a new domain controller running a Server Core installation of Windows Server 2012 instead of in-place upgrading an existing domain controller that runs a Server Core installation of Windows Server 2008 R2. Another option is to demote the Server Core installation and remove the DNS Server role. Then, you can successfully in-place upgrade the server, re-apply the DNS Server Role and promote the server again, but really… is that less work?

When a solution comes available, you’ll be the first to know.

Fun with FSMO roles and Functional Levels on Server Core Domain Controllers

Sometimes, in an environment with all Server Core Domain Controllers, it is hard to migrate your Active Directory Domain Controllers from Server Core installations of Windows Server 2008 to Server Core installations of Windows Server 2008 R2.

Steps

The steps to migrate Server Core Domain Controllers on Windows Server 2008 to Windows Server 2008 R2 through Transitioning, are:

  1. Perform a system state back-up of the Windows Server 2008 Server Core Domain Controllers
  2. Run adprep.exe or adprep32.exe from the Windows Server 2008 R2 installation media (depending on the processor architecture of the Windows Server 2008 Server Core Domain Controllers, ie. x86 or x64)
  3. Install Windows Server 2008 R2 Server Core on servers and promote them to Domain Controllers for your existing domain, using dcpromo.exe 
  4. Check the dcpromo.log and dcpromoui.log files and the event viewer to search for possible problems
  5. Take care of FSMO roles and Global Catalog placement
  6. Demote your Windows Server 2008 Server Core Domain Controllers
  7. Raise the Domain Functional Level and  Forest Functional Level

For more information on these steps, read this blog post.

While many steps in the process can be performed, like one would on Full installations of these Operating Systems, other steps may be performed using the Remote Server Administration Tools (RSAT). Two steps, in particular, though, proves to be cumbersome when performing through the Remote Server Administration Tools. It turns out, these steps are actually fun to perform on the PowerShell of your Server Core Domain Controllers. These steps would be step 5 and step 7.


Manage FSMO roles

On a Windows Server 2008 R2 Server Core Domain Controller to transfer a Flexible Single Master Operations Role, perform one of these PowerShell one-liners:

Tip!
Don’t forget to run Import-Module Active Directory before running any of the below commands…

  • For the Schema Master FSMO role:

    Move-ADDirectoryServerOperationMasterRole -Identity FullyQualifiedDomainNameOfTheDC -OperationMasterRole SchemaMaster 


  • For the Domain Naming Master FSMO role:

    Move-ADDirectoryServerOperationMasterRole -Identity FullyQualifiedDomainNameOfTheDC -OperationMasterRole DomainNamingMaster 


  • For the Primary Domain Controller (PDC) emulator FSMO role:

    Move-ADDirectoryServerOperationMasterRole -Identity FullyQualifiedDomainNameOfTheDC -OperationMasterRole PDCEmulator 


  • For the RID Pool Master FSMO role:

    Move-ADDirectoryServerOperationMasterRole -Identity FullyQualifiedDomainNameOfTheDC -OperationMasterRole RIDMaster 


  • For the Infrastructure Master FSMO role:

    Move-ADDirectoryServerOperationMasterRole -Identity FullyQualifiedDomainNameOfTheDC -OperationMasterRole InfrasturctureMaster 


    To transfer all FSMO roles, obviously perform all five one-liners.

    Manage Functional Levels

    In Windows Server 2008 R2, with the new Active Directory PowerShell cmdlets, two new exiting Active Directory PowerShell command emerged:

    1. Set-ADDomainMode
    2. Set-ADForestMode

    These two commands can be used to raise the Domain Functional Level and the Forest Functional Level, respectively. Not only are they able to raise the level, they are also able to return to roll back the functional level raise. (unless one of the Optional Features has been enabled)

    To raise the Domain Functional Level to Windows Server 2008 R2, run the following command, after all the Domain Controllers in your domain run Windows Server 2008 R2:

    Set-ADDomainMode –identity domain.tld –DomainMode Windows2008R2Domain


    To raise the Forest Functional Level to Windows Server 2008 R2, run the following command, after all the domains in the forest have been raised to Windows Server 2008 R2:

    Set-ADForestMode –identity domain.tld –ForestMode Windows2008RForest

  • How to install a Server Core R2 Domain Controller

    Server Core installations were a new feature in Windows Server 2008. Now, in Windows Server 2008 R2, it has been given a major upgrade. It now includes the .Net Framework, Active Directory Certificate Services, etc.

    Over three years ago I showed you how to install a Server Core Domain Controller in Windows Server 2008. A lot of people found this useful information. So, with Windows Server 2008 R2 looking towards Service Pack 1 (SP1), I thought I’d show you how to install Server Core R2 Domain Controller.

    The process to install a Server Core R2 Domain Controller differs somewhat from the installation process of a Windows Server 2008 Server Core Domain Controller.

    This blogpost explains the differences, by walking through the process:

    Step 1: Install the Operating System
    Step 2: Configure basic settings
    Step 3: License the Server
    Step 4: Update the Server
    Step 5: Install the roles and features
    Step 6: Install additional features
    Step 7: Update the Server
    Step 8: Run the Best Practices Analyzer


    Step 1: Install the Operating System

    Before you install any Operating System on any box, make sure you upgrade the BIOS and any applicable firmware to the latest stable version. Also make sure the box meets the minimum hardware requirements for Windows Server 2008 R2:

    • One 1,4 GHz x86-64bit capable processor
    • 512 MB RAM
    • 32 GB free hard disk space

    Although, these system requirements will allow you to install Windows Server 2008 R2, it’s practical to insert a DVD player to read the DVD, created using the ISO file for Windows Server 2008 R2.

    Installing Windows Server 2008 R2 is a simple process. Simply boot from the DVD and perform the following steps:
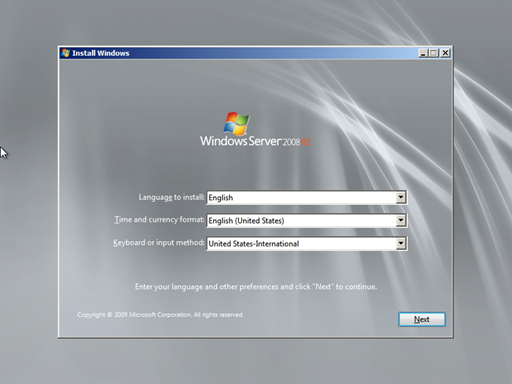
    SCDC1-2010-10-01-10-22-37

    In the Install Windows screen select the Language to install, Time and currency format and Keyboard or input method. When done, click Next.

    SCDC1-2010-10-01-10-22-47

    In the second Install Windows screen, click on Install now.
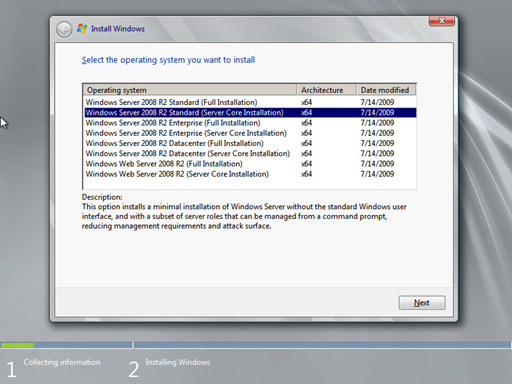
    SCDC1-2010-10-01-10-23-10

    In the Select the operating system you want to install screen, select Windows Server 2008 R2 Standard (Server Core Installation) from the list.

    Note:
    In some environments the Enterprise edition might be recommended, based upon the needs of the organization. Check this blogpost to make a decision between Windows Server Standard Edition and Windows Server Enterprise Edition.


    When done, click Next.
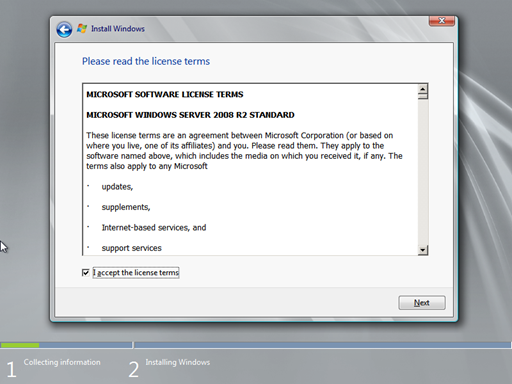
    SCDC1-2010-10-01-10-23-20

    In the Please read the license terms screen, select the I accept the license terms option and click Next. If your curious about the license terms or want to know how you’re selling your soul to Microsoft, you might want to read the whole license terms.
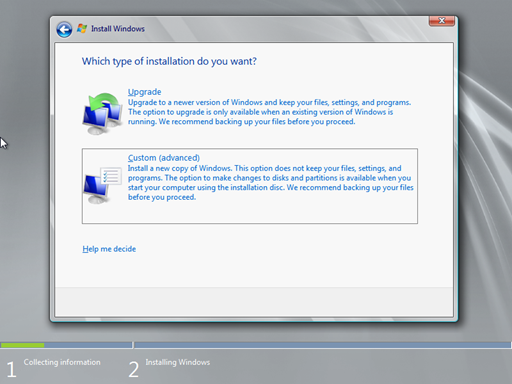
    SCDC1-2010-10-01-10-23-32

    In the Which type of installation do you want? screen, select the Custom (advanced) option. This will install a new copy of Windows. This option does not keep your files, settings and programs.
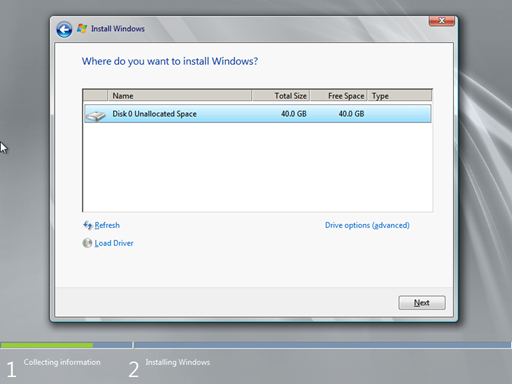
    SCDC1-2010-10-01-10-23-46

    The final question in the Windows Server 2008 R2 installation process is Where do you want to install Windows? Since this is a new box, the built-in 40GB disk will do.

    Tip!
    It is a best practice to place dynamic data on a different partition than the system partition in Windows. You might want to partition the disk to dedicate room to the Active Directory Transaction Logs, Active Directory database and System Volume (SYSVOL). For more information, look here.


    Now, Windows Server 2008 R2 will install on the system.

    Step 2: Configure basic settings 

    Once your Server Core installation is complete (this should only take about 10 minutes), you’re presented with the logon screen.
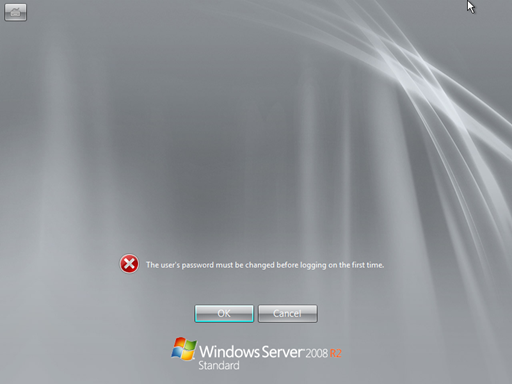
    SCDC1-2010-10-01-10-45-13

    The first time you log on to Windows Server 2008 R2 you need to change the password. Press OK, than enter a new password twice and press the orb. When done, click OK to acknowledge you now have a password.

    Note:
    The password needs to comply with complexity requirements.
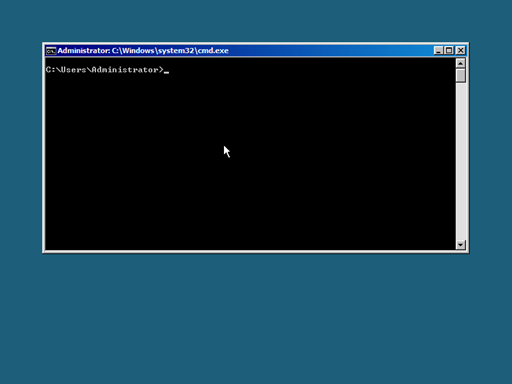
     

    SCDC1-2010-10-01-10-50-54

    Congratulations! You are now at the console of a Server Core installation.

    Let’s configure the box with some basic settings, like a computername you can actually remember and some IP settings to fit into your current environment. To this purpose we’re starting up sconfig.cmd.

    SCDC1-2010-10-01-11-00-52

    With this built-in Server Configuration tool, you can easily see and change settings. As you might notice at a first glance, the server is autonamed. Let’s change the computername.

    Press 2, Enter and then Enter new computer name (Blank=Cancel). I decided to name this server SCDC1. After pressing Enter, you will be confronted with a message stating the computer needs to be restarted to apply these setting. Press Yes to reboot.

    After the reboot, log on with the password you provided earlier.

    Now we’re ready to insert some meaningful IP information. Start up sconfig.cmd again and choose option 8) Network Settings. by typing 8 and an Enter. This will land you in the Network Settings menu.
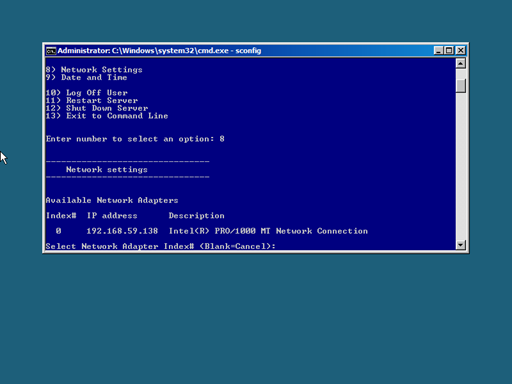
    SCDC1-2010-10-01-11-10-25 

    For this blogpost I’m using a system with a single Network Interface Card (NIC). The IP address in the screenshot has been assigned by DHCP.

    Note:
    An Active Directory Domain Controller, however, needs a fixed IP address to be able to register it’s A and SRV records.

    Note:
    In Server Core installations of Windows Server 2008 and Windows Server 2008 R2, IPv6 is disabled by default.


    When in the Network Settings menu of the Server Configuration tool, press the index number of the NIC you want to modify. (in my case 0) Then type 1, followed by an Enter to access the menu where you change the IPv4 address. Type S and Enter to specify a Static IP address. Then, type the IPv4 address for the server. In my case I’ll use the 192.168.59.10 address, which I enforce with Enter. The default Subnet will do in this case, so I’ll accept it with Enter. As my Default Gateway (the nearest router) I choose 192.168.59.2. An Enter completes this submenu.

    The server now has a static IPv4 address. It, however, does not have any DNS Servers configured, so in the Network Settings menu for the NIC, type 2, followed by an Enter. Now type the IPv4 address of the primary DNS Server you’d like to use. Press Enter when done. Click on OK in the message stating “Preferred DNS Server set”. If you want to set a secondary DNS Server you also have the chance. I cancelled out on this by simply pressing Enter.

    Step 3: License the Server

    Now, our Server Core Domain Controller is able to communicate with the network.
    Let’s enter the Windows Product Key for our system to continue to enjoy its bountiful commandline.

    Type the following two commands to license the server with a KMS host:

    start /w slmgr.vbs -ipk YC6KT-GKW9T-YTKYR-T4X34-R7VHC
    start /w slmgr.vbs –ato


    Step 4: Update the Server

    Before we apply Server roles and features to the server, it is essential to update the server with the latest Windows updates.

    The Server Configuration tool (sconfig.cmd) has a menu option to set Windows Update settings and an option to manually update the server. By default the Windows Update settings are set to update manually (the administrator specifies when and what updates to download and when and what updates to install).

    First, let’s enter the Windows Update submenu by pressing 5 and Enter.
    Press A, followed by Enter to set Windows Update to Automatic.
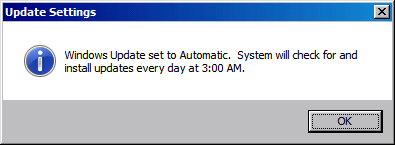
    WUA

    Press OK to acknowledge the change to the Windows Update settings.

    Note:
    If you need more granular control over Windows Update settings, specify these settings with a Group Policies, after you’ve created the domain.


    To manually update the Windows Server now, press 6 and Enter in the Server Configuration Tool. Choose to search for All updates, by pressing A and Enter. After a while, choose to download and install All updates, by (again) pressing A and Enter.

    restart

    After installing the Windows Updates, the box needs a restart. Press Yes to restart.

    Step 5: Install the roles and features 

    We can now turn our Windows Server installation into a functional Server, services clients and employees with meaningful information. For the purpose of this blogpost we’ll transform this vanilla Server Core installation into an Active Directory Domain Controller.

    The Active Directory Domain Services – Domain Controller role in Windows Server 2008 R2, features the Active Directory Gateway Services. This is a web service, that enables the Active Directory PowerShell cmdlets and the use of the Active Directory Administrative Center (remotely). In order to transform the server, we need to install the .Net Framework first with the following two commands:

    dism /online /enable-feature /featurename:NetFx2-ServerCore
    dism /online /enable-feature /featurename:NetFx3-ServerCore

    After installing the .Net Framework, we’re ready to install the binaries for the Active Directory Domain Services – Domain Controller role with the following commandline:

    dism /online /enable-feature /featurename:DirectoryServices-DomainController-ServerFoundation

    Now, all you need to do now to make the server a Domain Controller you’ll need to dcpromo it. Unlike a Full installation of Windows Server, though, the graphical version of the Active Directory installation wizard is not available on a Server Core installation.

    This only presents a minor issue, since we can use dcpromo.exe with an answerfile.
    Simply start up notepad.exe on your Server Core installation and copy,paste the following information into it:

    [DCInstall]
    NewDomain=forest
    NewDomainDNSName=demo.ogd.nl
    ReplicaorNewDomain=domain
    InstallDNS=Yes
    ConfirmGC=Yes
    DatabasePath="C:WindowsNTDS"
    LogPath="C:WindowsNTDS"
    SYSVOLPath="C:WindowsSYSVOL"
    SafeModeAdminPassword=P@ssword 
    RebootonSuccess=Yes


    This will create a Domain Controller for a new domain in a new forest, named demo.ogd.nl. You may change settings according to your environment. To create an answerfile for chilc domain creation, replica domain controller creation, etc. check out Microsoft KnowledgeBase article 947034.

    Save the file as dcpromo.txt and use it in the following commandline:

    dcpromo.exe /unattend:C:usersadministratordcpromo.txt 

    The system will reboot automatically. After this reboot use Notepad to open the log files:

    • C:WindowsDebugDCPromo.log
    • C:WindowsDebugDCPromoUI.log.

      Step 6: Install additional features 

      Your Server Core Domain Controller might benefit from the following Server Features, when you install them. The Active Directory PowerShell commandlets, from my point of view, are essential on a Domain Controller. You might install these with the following two commands:

      dism /online /enable-feature /featurename:MicrosoftWindowsPowerShell
      dism /online /enable-feature /featurename:ActiveDirectory-PowerShell

      While you’re at it, I recommend also installing Windows Backup and its corresponding PowerShell cmdlets:

      dism /online /enable-feature /featurename:WindowsServerBackup
      dism /online /enable-feature /featurename:WindowsServerBackupCommandlet


      These will help you make Active Directory aware backups.

      Step 7: Update the Server  

      With some Server Roles and Features installed, the attack surface of your Server Core installation has dramatically increased. As a best security practice, I recommend updating the server again. Run through step 4 again to make it happen.

      On top of the 28 updates I got previously, I now receive an additional 5 updates.

      Step 8: Run the Best Practices Analyzer 

      With Windows Server 2008 R2 it has become harder to install a sloppy Domain Controller. With its built-in Best Practices Analyzer (BPA) and accompanying BPA rule updates, administrators can compare their Active Directory environments with the Microsoft Best Practices.

      To install the Active Directory Best Practices Analyzer, run the following commands:

      dism /online /enable-feature /featurename:ServerManager-PSH-Cmdlets
      dism /online /enable-feature /featurename:BestPractices-PSH-Cmdlets

      Now you can use Server Manager (servermanager.msc) MMC from a Full Installation of Windows Server 2008 R2 or the Server Manager (servermanager.msc) MMC from the Remote Server Administration Tools (RSAT) on a Windows 7 member workstation to kick-off and review Best Practices.

      However, you can also kick-off and review a Best Practices Analysis from the commandline of your Server Core Domain Controller. To achieve this, run the following commands:

      powershell.exe
      Import-Module ServerManager
      Import-Module BestPractices
      Invoke-BPAModel –BestPracticesModelID Microsoft/Windows/DirectoryServices

      If you want to have the results in a humanly readable format on your Server Core box, ask for the output and export it to either CSV or HTML. In case of HTML, run the following command:

      Get-BpaResult -BestPracticesModelId Microsoft/Windows/DirectoryServices | Where-Object {$_.Severity -eq "Error" -or $_.Severity -eq “Warning” } | ConvertTo-Html -Property Severity,Category,Title,Problem,Impact,Resolution,Help -Title "BPA Report for Active Directory" -Body "BPA Report for Active Directory <HR>" –Head "<title>BPA Report</title><style type=’text/css’> table  { border-collapse: collapse; width: 700px } body   { font-family: Arial } td, th { border-width: 2px; border-style: solid; text-align: left; padding: 2px 4px; border-color: black } th     { background-color: grey } td.Red { color: Red } </style>"  | Out-File "\demo.ogd.nlnetlogonbpa.html"

      This will create a HTML file in the Netlogon folder, where you can pick it up with Windows 7 or Full installation of Windows Server 2008 R2.

      Further reading

      Install an Additional Domain Controller on Server Core R2 
      Active Directory Management with PowerShell in Windows Server 2008 R2  
      Implementing Windows Server Core 2008 R2 Domain Controllers 
      Creating a new Domain Forest on Server Core  
      Installing Active Directory on Server Core with an Answer File   
      Prepare your Domain for the Windows Server 2008 R2 Domain Controller  
      Installing a Read Only Domain Controller on Server Core with an Unattend File  
      How to Install Windows Server 2008 R2 Tutorial Series  
      Hardening guide for Windows 2008 R2 Domain Controller and DNS Server

      Some Server Core Domain Controllers heading for a dead end street

      Dead end street ahead

      You know, in terms of deploying servers in a smart way, so you can actually utilize them for as long as their economical lifecycle in a supported fashion without a need to reinstall them, I’ve made a stupid decision in advising IT Pros to deploy Server Core Domain Controllers in the last two years.

      The problem, you see, is the product team responsible for Active Directory has made a design choice to leave the old world of RPC behind and to introduce a new way to manage Domain Controllers: using the Active Directory web service.

      Windows Server 2008 R2 is the first Windows Server product featuring this new service, which besides the server component of the web service, also unlocks the usage of a whole load of other goodies like Active Directory PowerShell cmdlets and the Active Directory Administrative Center (ADAC). (when used from a Windows 7 or Windows Server 2008 R2-based management box)

      While the decision was made a while ago, only now do I realize the impact. Now that Microsoft released the Active Directory Management Gateway Service (Active Directory Web Service for Windows Server 2003 and Windows Server 2008) and both Jorge and Tomasz blogged about it. This Stand-alone Update Package basically adds the Active Directory Web Services service to Domain Controllers, running:

      • Windows Server 2003 with Service Pack 2
      • Windows Server 2003 R2 with Service Pack 2
      • Windows Server 2008
      • Windows Server 2008 with Service Pack 2


      Except there’s one problem: .Net Framework 3.5 with Service Pack 1 (SP1) is required. Whoops! That’s not exactly available on Server Core installations of Windows Server 2008 in a supported fashion.

      As a consequence Windows Server 2008-based Server Core Domain Controllers can not be used in combination with the Active Directory PowerShell cmdlets and the the Active Directory Administrative Center (ADAC).

      Note:
      Windows Server 2008 R2-based Server Core Domain Controllers, however, can be managed using the Active Directory PowerShell cmdlets and the Active Directory Administrative Center (ADAC). One of the new features of Server Core installations in Windows Server 2008 R2 is the availability of the .Net Framework.


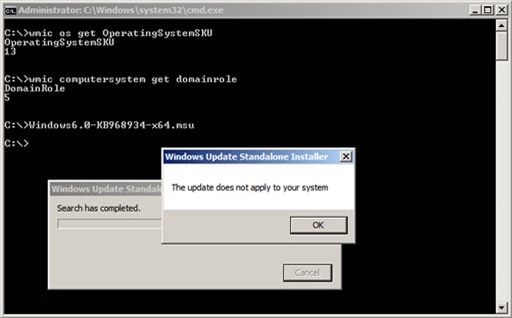
      Actually when you try to install the Active Directory Management Gateway Service on a Windows Server 2008-based Server Core Domain Controller a check is performed upon your system.

       Error_SC_ADWGS

      Server Core installations fail the check. The result is an error stating “The update does not apply to your system” as shown above on a x64 Server Core installation of Windows Server 2008 (OperatingSKU 13). This box was setup as a Domain Controller and configured with the Primary Domain Controller emulator (PDCe) FSMO role (DomainRole 5).


      Concluding

      When running an environment with Windows Server 2008-based Server Core Domain Controllers, a requirement to use the Active Directory PowerShell cmdlets or Active Directory Administrative Center (ADAC) implicates the need to reinstall the Windows Server 2008-based Server Core Domain Controllers as Full installations or the need to upgrade the Windows Server 2008-based Server Core Domain Controllers to Windows Server 2008 R2-based Server Core Domain Controllers.

      Further reading

      Download Details: Active Directory Management Gateway Service 
      What does the Active Directory Management Gateway Service do?  
      What’s New in AD DS: Active Directory Web Services   
      The Active Directory Management Gateway Service is now available 
      Active Directory Management Gateway Service for Windows Server 2003 and 2008 
      Manage YOUR Windows 2003/2008 DCs USING AD POWERSHELL !   
      The Active Directory Management Gateway Service is now Available for Windows Server 2008 and Windows Server 2003 
      Active Directory Management Gateway Service 
      Have you successfully installed Active Directory Management Gateway Service on 2008? 
      Active Directory Management Gateway Service is RTW 
      Q. What is Active Directory Management Gateway Service (ADMGS)?   
      What is Active Directory Management Gateway Service (ADMGS)? 
      Active Directory Gateway WebService is available for ‘legacy’ OSes