KnowledgeBase: Server Core Web Servers are not manageable remotely by default
![]() In Windows Server 2012 and Windows 8, Server Manager can be used to remotely manage both Full Installations and Server Core Installations of Windows Server 2012.
In Windows Server 2012 and Windows 8, Server Manager can be used to remotely manage both Full Installations and Server Core Installations of Windows Server 2012.
Tip!
To gain access to the Server Manager functionality in Windows 8, install the Remote Server Administration Tools package. Next, you can use the Start Screen to search for the Administrative Tools folder. You will find a shortcut to Server Manager in this folder.
One of its features is the ability to install and uninstall Server Roles and Features remotely. This is extremely helpful in scenarios where you’d want to install multiple servers with the same Server Role at once (like the Web Server Role), but also when you’re managing Server Core installations, since Server Manager provides a graphical user interface (GUI) to make you easily achieve a lot of your configuration tasks.
The challenge
Many of the Server Roles available in Server Core can be installed and configured remotely. I know many admins like to use Server Manager and the Remote Server Administration Tools to manage their Server Core installations that way. Therefore, I find it a shame, that the Web Server Role cannot be installed to a basic configured state using the above method. ![]()
The Web Server Server Role can be installed on its own, but it is also installed when you install one of the next Server Roles in Windows Server 2012:
- FTP Server
- DirectAccess Server
- IP Routing
- Windows Server Update Services
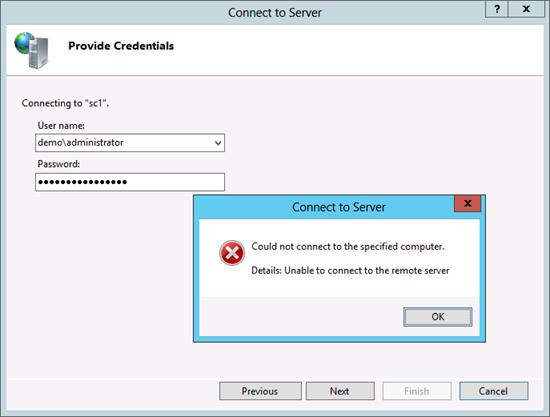
When you try to connect with the Internet Information Services (IIS) Manager from a remote Windows Server 2012 installation, after you install the Web Server Role or any of the Server Roles above, you will be presented with an error message:
The explanation
The root of the problem is, by default, when you install the Web Server Server Role on Server Core, the Web Management Service Role Service is not installed by default.
Security, Part 1
The reason Microsoft does not install the Web Management Service is this would mean a setback from a security perspective to the Windows 2000 Server days (where Internet Information Services were installed and enabled by default on each install). To be frank, not all Web Servers need a remote web management service, listening on management requests. Indeed, with access to the console, the many Internet Information Services-related PowerShell Cmdlets and, of course, the Web Platform Installer, remote management isn’t always needed.
To make things worse, even if you pay attention during the installation of the above Server Roles, you still wouldn’t be able to manage Web Servers remotely with the Internet Information Services (IIS) Manager, since the Web Management Service is not configured or started, by default.
Security, Part 2
Although the Web Management relies on authentication to be accessible and the communication between the Internet Information Services (IIS) Manager is encrypted (optionally), opening a management service listening on a TCP port is a bad idea for publicly connected machines. Therefore, the Web Management Service, by default, is not configured for remote management and its service is not running after installation.
This configuration can be done … wait for it… through the registry. ![]()
You can perform these changes through Group Policy Preferences (for domain-joined Web Servers, FTP Servers, WSUS Servers, DirectAccess Servers and IP routers. Alternatively, you can use Remote Registry access or script the change with *.reg files through PSExec. Regedit.exe, however, is available on the command line of Server Core installation, so you can make this change on the console itself.
Of course, after a change, the Web Management Service (WMSVC) needs to be configured to start automatically and, then, started.
The solution
So, to manage a Web Server remotely, you will need to perform the following actions:
- Install the Web Management Service Role
- Configure the Web Management Service
- Configure the Web Management Service to start automatically
- Start the Web Management Service
Install the Web Management Service Role
Install the Web Management Service Role on your Server Core installation by either installing it through Server Manager on a Full Installation of Windows Server 2012.
To install the Web Management Service from the console of your Server Core installation, run the following PowerShell command:
Install-WindowsFeature Web-Mgmt-Service
Configure the Web Management Service
The Web Management Service can be configured through the Registry. Its settings are located in HKLMSoftwareMicrosoftWebManagementServer.
Simply start the Registry Editor on the console of your Server Core installation by typing regedit.exe, and change he value for EnableRemoteManagement from 0 to 1. Close RegEdit with Alt+F4 or by clicking the X symbol in the right top of the program.
Configure the Web Management Service to start automatically
Next, configure the Web Management Service for automatic start. Type the following command on the console of your Server Core installation:
sc config WMSVC start= auto
Start the Web Management Service
All we need to do now, is start the Web Management Service:
net start WMSVC
Concluding
Microsoft has gone to great lengths to make the Web Server as secure as possible. When you remotely manage Server Core-based Web Servers, however, you will hit some bumps on the way. This blogpost explains how to pass them

