Windows Server 2008 R2

Definitive list of Windows Server installations without GUIs

Datacenter

‘Server Core’ has been around for quite a while. Roughly for as long as this domain exists (registered on January 19, 2008, while Windows Server 2008 was released on February 4, 2008).


About Server Core

Server Core is a significantly scaled-back installation and/or run type for Windows Server where no Windows Explorer shell is installed. All configuration and maintenance is done entirely through command-line interface windows, or by connecting to the machine remotely using Microsoft Management Console. However, Notepad and some control panel applets, such as Regional Settings, are available.

Microsoft’s primary motivation for producing a Server Core variant of Windows Server was to reduce the attack surface of the operating system.


List of Windows Server versions

A question I get regularly is which Windows Server versions can be run without Graphical User Interface, which Windows Server versions come without a GUI and which Windows Server offer the Server Core installation option.

The list below serves as the definitive list of released Windows Server versions.
It will be updated when Microsoft releases new versions of Windows Server.

Windows Server 2008

Released: February 4, 2008
Server Core: Installation option

Windows Server 2008 was the first version of Windows Server 2008, where the Server Core installation option could be chosen. Server Core was not the default installation option. Server Core installations of Windows Server 2008 do not offer .NET or PowerShell, but do offer the pre-release version of Hyper-V out of the box.

Hyper-V Server 2008

Released: December 30, 2008
Server Core: Only

Hyper-V Server 2008 was the first release of Microsoft’s purpose-built Hypervisor installation version. It is unavailable with a GUI and most Server Roles cannot be installed or configured. To facilitate configuring Hyper-V Server, it came with hvconfig.cmd, hvconfig.vbs and WUA_SearchDownloadInstall.vbs.

Windows Server 2008 R2

Released: October 22, 2009
Server Core: Installation option

Windows Server 2008 R2 added .NET and Windows PowerShell to the Server Core installation option.

Hyper-V Server 2008 R2

Released: October 22, 2009
Server Core: Only

Hyper-V Server 2008 R2 was introduced alongside Windows Server 2008 R2.

Windows Server 2012

Released: October 30, 2012
Server Core: Default installation option, switchable

Windows Server 2012 did away with the Enterprise edition of Windows Server. However, it added the ability to add and remove the GUI layers in full installations of Windows Server to get to a Server Core installation from an attack surface point of view.

Server Core installation of Windows Server 2012 were the first installations that featured sconfig.cmd, a derivative of Hyper-V Server’s hvconfig.cmd.

Hyper-V Server 2012

Released: October 30, 2012
Server Core: Only

Hyper-V Server 2012 is a logical upgrade to Hyper-V Server 2008 R2.

Windows Server 2012 R2

Released: November 25, 2013
Server Core: Default installation option, switchable

Windows Server 2012 R2 introduced several new roles, including the new Web Application Proxy role, that are perfectly suitable to be outfitted as Server Core installations. This is the last version where the GUI layers can be removed and added.

Hyper-V Server 2012 R2

Released: November 25, 2013
Server Core: Only

Hyper-V Server 2012 R2 is the purpose-built version of Windows Server for Hyper-V.

Windows Server 2016

Released: October 15, 2016
Server Core: Default installation option

Windows Server 2016 removed the ability to add and remove the GUI layers. If Server Core is needed, it needs to be installed as Server Core installation. In this version, ‘Full installation’ is remarketed as ‘Windows Server with Desktop Experience’.

Windows Server 2016 is the first Long Term Servicing Channel (LTSC) release in Microsoft’s new release schedule for Windows Server.

Hyper-V Server 2016

Released: October 15, 2016
Server Core: Only

Windows Server, version 1803

Released: April 30, 2018
Server Core: Only

Windows Server version 1803 was the first semi-annual (SAC) release of Windows Server. Semi-annual releases are available as Server Core, only. Windows Server version 1803 focused on making container technology available to organizations.

Windows Server, version 1809

Released: November 13, 2018
Server Core: Only

Windows Server version 19809 is a semi-annual release of Windows Server as Server Core only. Its release coincided with the release of Windows Server 2019, but offered many skip-ahead features.

Windows Server 2019

Released: November 13, 2018 (December 2018)
Server Core: Default installation option

After being announced at Ignite 2018 in Orlando, Microsoft released Windows Server 2019 on November 23, 2018. It was released for two short days, until reported problems lead to the conclusion at Microsoft that the quality of the Operating Systems was sub-par. It was rereleased in December 2018 and features Features on Demand for application compatibility.

Windows Server, version 1903

Released: May 21, 2019
Server Core: Only

Windows Server version 1903 is a semi-annual release of Windows Server as Server Core only.

Hyper-V Server 2019

Released: November 13, 2018 (June 2019)
Server Core: Only

After many months of delays, Hyper-V Server 2019 was released in June 2019.


Further reading

Windows Server release information

KnowledgeBase: Unable to convert to Server with a GUI from Server Core on an upgraded Windows Server 2012 machine

pilebooksMicrosoft has released KnowledgeBase article 2775484, that describes a situation, where you’re unable to convert an upgraded Windows Server 2012 Full Installation to Server Core and back.

The situation

You upgrade a full installation of Windows Server 2008 x64 or Windows Server 2008 R2 to Windows Server 2012 and choose the option “Server with a GUI”.

After the upgrade you convert the Server with a GUI installation to Server Core.
In this scenario, if you try to convert back to Server with a GUI, the operation may fail and rollback to Server Core.

The cause

This problem occurs, because of three registry entires from Windows Server 2008 or Windows Server 2008 R2 being retained during the upgrade:

These three registry entries exist in

HKLMSOFTWAREMicrosoftWindowsCurrentVersionWINEVTPublishers


And are named:

  • {bc2eeeec-b77a-4a52-b6a4-dffb1b1370cb}
  • {57e0b31d-de8c-4181-bcd1-f70e880b49fc}
  • {8c9dd1ad-e6e5-4b07-b455-684a9d879900}

The resolution

To be able to convert the Windows Server 2012 installation, these registry keys need to be removed.

You can perform these actions with RegEdit.ex, but, alternatively, you can start NotePad, paste the following three commands, save the file as a .bat file and then run it from an elevated command prompt:

reg delete HKLMSOFTWAREMicrosoftWindowsCurrentVersionWINEVTPublishers{bc2eeeec-b77a-4a52-b6a4-dffb1b1370cb}

reg delete HKLMSOFTWAREMicrosoftWindowsCurrentVersionWINEVTPublishers{57e0b31d-de8c-4181-bcd1-f70e880b49fc}

reg delete HKLMSOFTWAREMicrosoftWindowsCurrentVersionWINEVTPublishers{8c9dd1ad-e6e5-4b07-b455-684a9d879900}


After you restart the machine you will be able to convert the machine to a “Server with a GUI”.

What would you choose? Flexibility vs. Disk Space

Hard DiskWith Windows Server 2012, Microsoft has changed its Server Core strategy. In short, Microsoft now focuses on the flexibility to switch the Graphical User Interface (GUI) from a full installation to a minimal shell and even further down to server core, instead of reducing the disk space needed to run the Operating System. (the ‘disk foot print’)

Is this bad?

Many systems administrators will tout the advantages of a small disk foot print in the following ways:

  1. Faster to implement
    With less data on a (virtual) disk, the Operating System can be deployed faster initially. When deploying over the network, less data needs to be transmitted, resulting in a faster deployment and also less strain on the network.
      
  2. Less hardware needed
    If you need less disk space, you can use cheaper disks in your systems. When deploying virtual servers, less expensive SAN storage is needed.
      
  3. More secure
    Less data on a disk results in a significantly smaller attack surface. If there’s less code in use, then less errors in code can be leveraged.

However, these three arguments are moot points.

First of all, I’ve rarely seen an admin sitting idly by a server watching it install its Operating System. If he/she is not documenting what he/she just did or already preparing next steps in the deployment process, he/she is probably checking out social media or solving another incident.

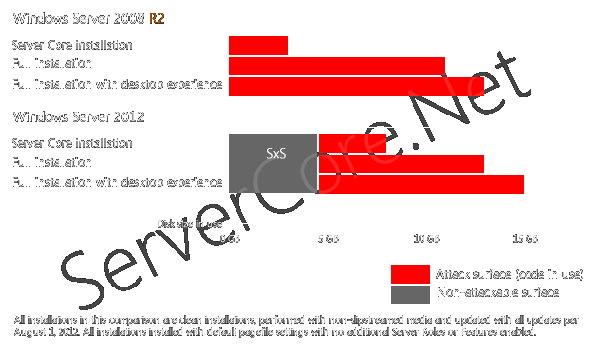
Second, disk hardware is not expensive anymore. The difference between a Server Core installation and a Full installation in Windows Server 2008 R2 is 7GB. You cannot buy physical disks in this size range. Also, on SAN storage, disk deduplication significantly decreases the factual disk foot print on the SAN itself.

The third point is a bit harder to debate, although the ‘in use’ part is the actual part of the sentence that makes the difference. While Server Core installations in Windows Server 2012 have a bigger disk foot print, a smaller percentage of that code is actually in use when you compare it to Windows Server 2008 R2-based Server Core installations. As I’ve explained in my blogpost Permanent Link to Updating Server Core and switching GUIs, a Server Core installation differs from a full installation by the amount of GUI-related features hardlinked to in the Side by Side store in the C:WindowsWinSxS folder, which in turn is linked to the C:WindowsServicingPackages folder.

Graphical

The diagrams below illustrate the differences in disk foot print between Server Core and Full installations of Windows Server 2008 R2 and Windows Server 2012:

Comparison of Server Core Disk Foot Print and Attack Surface between Windows Server 2008 R2 and Windows Server 2012

The real impact

Apart from the flexibility Microsoft is giving us to switch between the full Graphical User Interface and more minimal user interfaces, there is some real impact with Microsofts new Server Core strategy. One of the most prominent areas of impact is virtual migrations, whether they are Storage vMotions, Storage Migrations (with System Center Virtual Machine Manager), Live Storage Migrations or Shared Nothing Live Migrations: Migrating the storage for a virtual machine running Server Core will take longer, since there is more disk data to transfer.

The alternative

An alternative way Microsoft could have shaped its new Server Core strategy would be with a ‘net-install’. We see these kinds of installs regularly with Linux flavors, where the base installer is run from a setup/live disk and every add-on component is downloaded from (distributed) repositories on the web. Given the recent certificate collision attacks on the Windows Update functionality, I think it’s a good thing Microsoft decided not to pursue this idea. It will be hard to guarantee the integrity of system files when you need to get these from the web.

What do you think?

Do you think Microsoft did the right thing to hand us the flexibility of switching GUIs in the way they did it, would you go for the alternative or would you fix Server Core in a whole other way?

5 reasons why small and medium sized organizations choose Hyper-V

Partnership-iconIn todays market, Microsoft looks like it is playing catch up to VMware in the server virtualization / hypervisor space. VMware released vSphere 5 and ESXi (Free) 5 a year ago (July 2011) and the only release Microsoft did in this timeframe is Windows Server 2008 R2 Service Pack 1. (March 2011) This release brought Dynamic Memory and RemoteFX.

The question, however, is not if the situation in the market is true, but why a lot of organizations are adopting Microsoft’s virtualization stack instead of VMware’s. Especially in smaller companies, CIOs are more likely to adopt Microsoft’s technologies.

This article explains the main reasons why:


  • Non-enterprise companies don’t need enterprise features.
    While VMware’s flagship vSphere 5 product offers enterprise features like FT and can be extended with vShield and vCloud Director, most companies don’t need this functionality. Most of the time they can’t even afford the hardware required to get it al working. What they do have is a load of physical Windows hosts that result in a huge energy bill. Windows Servers can be virtualized with Hyper-V without problems, allowing organizations to start reducing their energy bills. (and perhaps start saving for those VMware Enterprise Plus licenses?)
      
  • Small and medium sized companies are no priority.
    As a VMware partner we often refer to VMware as ‘VoiceMailware’. Now, we offer virtualization-oriented services to organizations, ranging from as small as 50 seats to big companies with dozens of virtualization hosts. We know we’re not high on the VMware priority list, but sometimes being focused on profit reaches ridiculous levels. 
      
    While small companies require a lot of effort from our sales force, we still appreciate their business. A lot of Microsoft Partners share our attitude, and offer services to small organizations. It looks like VMware only picks enterprise-focused partners, partly due to the revenue requirements in their partner offerings. As a small organization, an enterprise-focused partner is not a great match.
      
  • The Windows their admins know
    While smaller companies can opt for the free Hyper-V Server, they might also benefit when they run a Full installation of Windows Server as their virtualization platform. The Hyper-V Manager and Cluster Manager tools come included with Windows Server and follow the ideas Microsoft have put in their products for years, both locally and remotely.  Even for Server Core installations and the cost-free Hyper-V Server product, a graphical UI is available to manage Hyper-V on the host, resembling the Hyper-V Manager of a Full installation. 
          
  • Microsoft’s free hypervisor is less limited than VMware’s
    In it’s cost-free server virtualization product, Microsoft has eliminated most of the limitations. Where VMware ESXi 5 Free is limited to 32GB host and guest RAM and does not offer vMotion, Microsoft Hyper-V Server 2008 R2 is ‘limited’ to 8 physical processors, 1TB of RAM and 256 Guests per host and it offers Live Migration between hosts. Both these hypervisors are free, but Hyper-V Server offers a scale up path to a (geo-stretched) highly available solution.
      
  • Licensing Hyper-V is just too easy for small to medium sized companies
    Most small to medium sized companies have bought their current servers with a Windows Server OEM license. These licenses can not be used for virtualization purposes, because they are tied to the physical machine and don’t include virtualization rights. Now, to license a bunch of virtual machines on a dual processor box, Windows Server Datacenter edition is a good solution, even for small businesses, because the license offers unlimited Windows Server virtualization rights when designated to a physical processor in a virtualization hosts. The most cost-effective way for small organizations to buy Windows Server Datacenter licenses is as OEM licenses. The Hypervisor comes installed and it’s Hyper-V! How easy is that! 

    Even if small to medium sized companies buy their hypervisor as part of a volume license with Software Assurance, why would they look at VMware? They already have the licenses and one supplier to talk and moan to.

3rd Party management applications and Server Core

ProgramMicrosoft introduced the Server Core Installation option in the pre-releases of Windows Server 2008 four years ago. Since that time, many improvements have been made to the manageability of Server Core installations. Also, many dedicated 3rd Party and open source Server Core management applications have been introduced and Server Core admin have adopted these and already existing tools to manage their servers.

Personally, I’m an advocate of using the built-in management capabilities of Windows Server. I feel Microsoft has made big strides in Server Core Management with sconfig and Server Manager Remoting in Windows Server 2008 R2. Realistically though, I still  run into fierce challenges sometimes to configure certain settings.

Sometimes I install an application for these purposes. Temporarily.

There’s a big reason why I won’t install 3rd party local management applications on my Server Core installations. I don’t use Revo Uninstaller and CCleaner on my boxes fulltime. They are part of my Server Core Helper DVD, along with a slew of other tools, but when I’m done with the settings they typically change, these programs are uninstalled.

Here’s why.

  1. Some of the applications I use were never designed or written with Server Core installations in mind. Calling a non-existent API might cause unpredictable behavior in these applications.
  2. Some of the applications have dubious ownership. Although the goal of the program may be to perform an action like removing unused items in Windows (Server Core doesn’t have much of these items, by the way), the goal of the writer or publisher of the application might be completely different. (installing adware, for instance, to gain an income or gathering statistics of usage of Server Core installations to justify the program itself to superiors)
  3. Any 3rd party application increases the attack surface of the installation. Remember, Microsoft uses a non-disclosure policy about vulnerabilities and hotfixes. The application you’ve installed on Server Core might just have a vulnerability that could make an attacker compromise the entire box.
  4. Keeping a Server Core installations with tons of 3rd party applications up to date is hard. Even if you pick applications from software publishers that have a disclosure policy for vulnerabilities, work actively to patch their products and have good reputations, keeping hundreds of their product installations up to date (with their update mechanism) is ad hoc, unreportable and thus unreliable. You lose overview pretty quickly.

A Server Core installation, however, will never be really rid of 3rd party applications. For UPS, anti-malware, backup & restore, reporting, monitoring, asset management and central management agents may still be needed, dependent on the environment.

For these 3rd party agents and applications a policy needs to be in place to keep these agents and applications up to date. Don’t make it harder on yourself than strictly needed and ban loading local management applications on your Server Core installations.

Fun with FSMO roles and Functional Levels on Server Core Domain Controllers

Sometimes, in an environment with all Server Core Domain Controllers, it is hard to migrate your Active Directory Domain Controllers from Server Core installations of Windows Server 2008 to Server Core installations of Windows Server 2008 R2.

Steps

The steps to migrate Server Core Domain Controllers on Windows Server 2008 to Windows Server 2008 R2 through Transitioning, are:

  1. Perform a system state back-up of the Windows Server 2008 Server Core Domain Controllers
  2. Run adprep.exe or adprep32.exe from the Windows Server 2008 R2 installation media (depending on the processor architecture of the Windows Server 2008 Server Core Domain Controllers, ie. x86 or x64)
  3. Install Windows Server 2008 R2 Server Core on servers and promote them to Domain Controllers for your existing domain, using dcpromo.exe 
  4. Check the dcpromo.log and dcpromoui.log files and the event viewer to search for possible problems
  5. Take care of FSMO roles and Global Catalog placement
  6. Demote your Windows Server 2008 Server Core Domain Controllers
  7. Raise the Domain Functional Level and  Forest Functional Level

For more information on these steps, read this blog post.

While many steps in the process can be performed, like one would on Full installations of these Operating Systems, other steps may be performed using the Remote Server Administration Tools (RSAT). Two steps, in particular, though, proves to be cumbersome when performing through the Remote Server Administration Tools. It turns out, these steps are actually fun to perform on the PowerShell of your Server Core Domain Controllers. These steps would be step 5 and step 7.


Manage FSMO roles

On a Windows Server 2008 R2 Server Core Domain Controller to transfer a Flexible Single Master Operations Role, perform one of these PowerShell one-liners:

Tip!
Don’t forget to run Import-Module Active Directory before running any of the below commands…

  • For the Schema Master FSMO role:

    Move-ADDirectoryServerOperationMasterRole -Identity FullyQualifiedDomainNameOfTheDC -OperationMasterRole SchemaMaster 


  • For the Domain Naming Master FSMO role:

    Move-ADDirectoryServerOperationMasterRole -Identity FullyQualifiedDomainNameOfTheDC -OperationMasterRole DomainNamingMaster 


  • For the Primary Domain Controller (PDC) emulator FSMO role:

    Move-ADDirectoryServerOperationMasterRole -Identity FullyQualifiedDomainNameOfTheDC -OperationMasterRole PDCEmulator 


  • For the RID Pool Master FSMO role:

    Move-ADDirectoryServerOperationMasterRole -Identity FullyQualifiedDomainNameOfTheDC -OperationMasterRole RIDMaster 


  • For the Infrastructure Master FSMO role:

    Move-ADDirectoryServerOperationMasterRole -Identity FullyQualifiedDomainNameOfTheDC -OperationMasterRole InfrasturctureMaster 


    To transfer all FSMO roles, obviously perform all five one-liners.

    Manage Functional Levels

    In Windows Server 2008 R2, with the new Active Directory PowerShell cmdlets, two new exiting Active Directory PowerShell command emerged:

    1. Set-ADDomainMode
    2. Set-ADForestMode

    These two commands can be used to raise the Domain Functional Level and the Forest Functional Level, respectively. Not only are they able to raise the level, they are also able to return to roll back the functional level raise. (unless one of the Optional Features has been enabled)

    To raise the Domain Functional Level to Windows Server 2008 R2, run the following command, after all the Domain Controllers in your domain run Windows Server 2008 R2:

    Set-ADDomainMode –identity domain.tld –DomainMode Windows2008R2Domain


    To raise the Forest Functional Level to Windows Server 2008 R2, run the following command, after all the domains in the forest have been raised to Windows Server 2008 R2:

    Set-ADForestMode –identity domain.tld –ForestMode Windows2008RForest

  • How to install a Server Core R2 Domain Controller

    Server Core installations were a new feature in Windows Server 2008. Now, in Windows Server 2008 R2, it has been given a major upgrade. It now includes the .Net Framework, Active Directory Certificate Services, etc.

    Over three years ago I showed you how to install a Server Core Domain Controller in Windows Server 2008. A lot of people found this useful information. So, with Windows Server 2008 R2 looking towards Service Pack 1 (SP1), I thought I’d show you how to install Server Core R2 Domain Controller.

    The process to install a Server Core R2 Domain Controller differs somewhat from the installation process of a Windows Server 2008 Server Core Domain Controller.

    This blogpost explains the differences, by walking through the process:

    Step 1: Install the Operating System
    Step 2: Configure basic settings
    Step 3: License the Server
    Step 4: Update the Server
    Step 5: Install the roles and features
    Step 6: Install additional features
    Step 7: Update the Server
    Step 8: Run the Best Practices Analyzer


    Step 1: Install the Operating System

    Before you install any Operating System on any box, make sure you upgrade the BIOS and any applicable firmware to the latest stable version. Also make sure the box meets the minimum hardware requirements for Windows Server 2008 R2:

    • One 1,4 GHz x86-64bit capable processor
    • 512 MB RAM
    • 32 GB free hard disk space

    Although, these system requirements will allow you to install Windows Server 2008 R2, it’s practical to insert a DVD player to read the DVD, created using the ISO file for Windows Server 2008 R2.

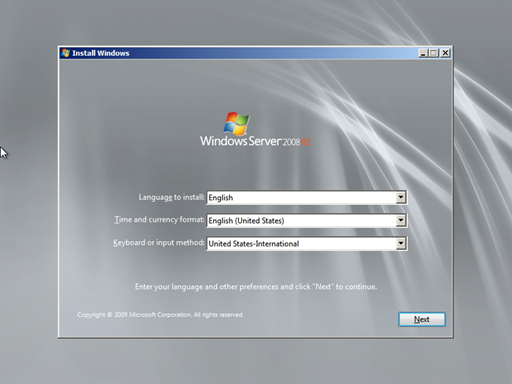
    Installing Windows Server 2008 R2 is a simple process. Simply boot from the DVD and perform the following steps:
    SCDC1-2010-10-01-10-22-37

    In the Install Windows screen select the Language to install, Time and currency format and Keyboard or input method. When done, click Next.

    SCDC1-2010-10-01-10-22-47

    In the second Install Windows screen, click on Install now.
    SCDC1-2010-10-01-10-23-10

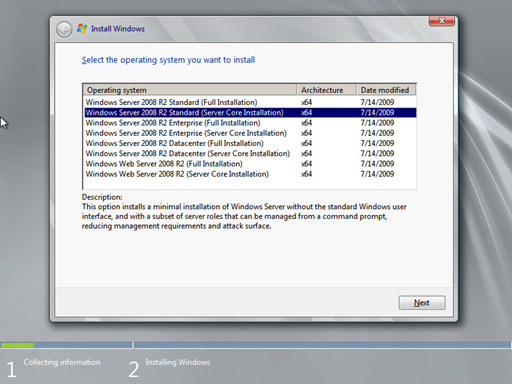
    In the Select the operating system you want to install screen, select Windows Server 2008 R2 Standard (Server Core Installation) from the list.

    Note:
    In some environments the Enterprise edition might be recommended, based upon the needs of the organization. Check this blogpost to make a decision between Windows Server Standard Edition and Windows Server Enterprise Edition.


    When done, click Next.
    SCDC1-2010-10-01-10-23-20

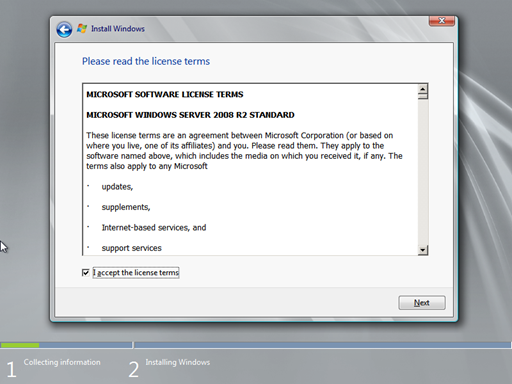
    In the Please read the license terms screen, select the I accept the license terms option and click Next. If your curious about the license terms or want to know how you’re selling your soul to Microsoft, you might want to read the whole license terms.
    SCDC1-2010-10-01-10-23-32

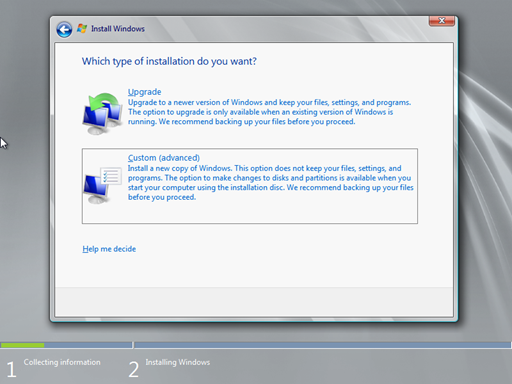
    In the Which type of installation do you want? screen, select the Custom (advanced) option. This will install a new copy of Windows. This option does not keep your files, settings and programs.
    SCDC1-2010-10-01-10-23-46

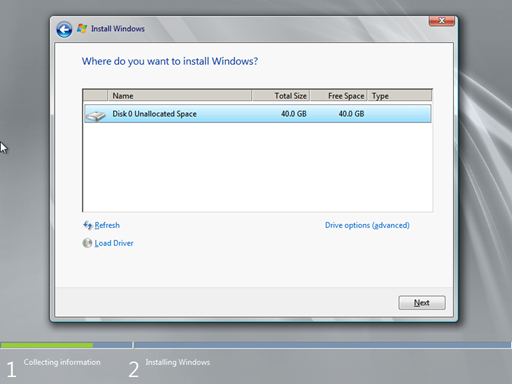
    The final question in the Windows Server 2008 R2 installation process is Where do you want to install Windows? Since this is a new box, the built-in 40GB disk will do.

    Tip!
    It is a best practice to place dynamic data on a different partition than the system partition in Windows. You might want to partition the disk to dedicate room to the Active Directory Transaction Logs, Active Directory database and System Volume (SYSVOL). For more information, look here.


    Now, Windows Server 2008 R2 will install on the system.

    Step 2: Configure basic settings 

    Once your Server Core installation is complete (this should only take about 10 minutes), you’re presented with the logon screen.
    SCDC1-2010-10-01-10-45-13

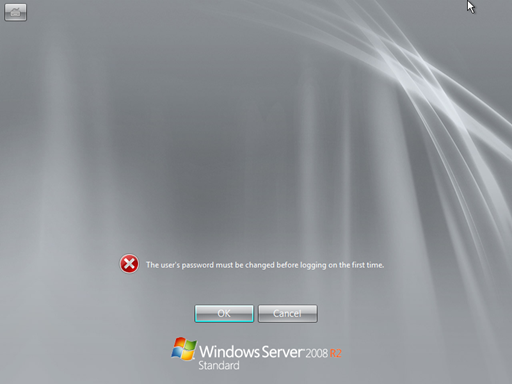
    The first time you log on to Windows Server 2008 R2 you need to change the password. Press OK, than enter a new password twice and press the orb. When done, click OK to acknowledge you now have a password.

    Note:
    The password needs to comply with complexity requirements.
     

    SCDC1-2010-10-01-10-50-54

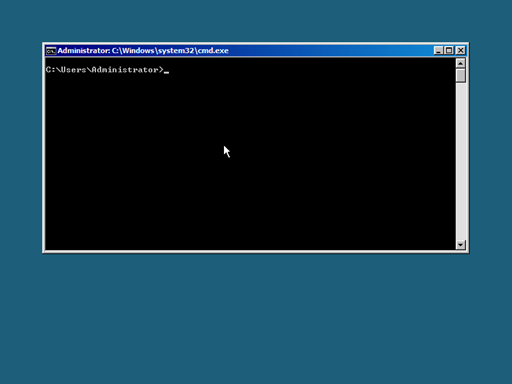
    Congratulations! You are now at the console of a Server Core installation.

    Let’s configure the box with some basic settings, like a computername you can actually remember and some IP settings to fit into your current environment. To this purpose we’re starting up sconfig.cmd.

    SCDC1-2010-10-01-11-00-52

    With this built-in Server Configuration tool, you can easily see and change settings. As you might notice at a first glance, the server is autonamed. Let’s change the computername.

    Press 2, Enter and then Enter new computer name (Blank=Cancel). I decided to name this server SCDC1. After pressing Enter, you will be confronted with a message stating the computer needs to be restarted to apply these setting. Press Yes to reboot.

    After the reboot, log on with the password you provided earlier.

    Now we’re ready to insert some meaningful IP information. Start up sconfig.cmd again and choose option 8) Network Settings. by typing 8 and an Enter. This will land you in the Network Settings menu.
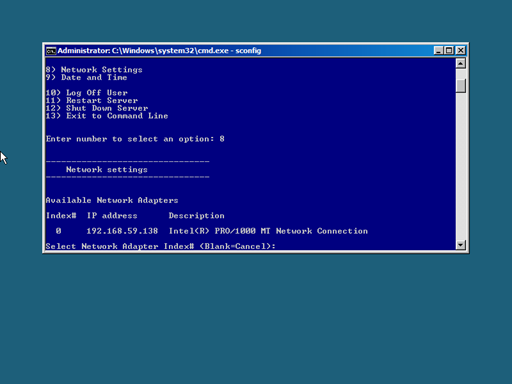
    SCDC1-2010-10-01-11-10-25 

    For this blogpost I’m using a system with a single Network Interface Card (NIC). The IP address in the screenshot has been assigned by DHCP.

    Note:
    An Active Directory Domain Controller, however, needs a fixed IP address to be able to register it’s A and SRV records.

    Note:
    In Server Core installations of Windows Server 2008 and Windows Server 2008 R2, IPv6 is disabled by default.


    When in the Network Settings menu of the Server Configuration tool, press the index number of the NIC you want to modify. (in my case 0) Then type 1, followed by an Enter to access the menu where you change the IPv4 address. Type S and Enter to specify a Static IP address. Then, type the IPv4 address for the server. In my case I’ll use the 192.168.59.10 address, which I enforce with Enter. The default Subnet will do in this case, so I’ll accept it with Enter. As my Default Gateway (the nearest router) I choose 192.168.59.2. An Enter completes this submenu.

    The server now has a static IPv4 address. It, however, does not have any DNS Servers configured, so in the Network Settings menu for the NIC, type 2, followed by an Enter. Now type the IPv4 address of the primary DNS Server you’d like to use. Press Enter when done. Click on OK in the message stating “Preferred DNS Server set”. If you want to set a secondary DNS Server you also have the chance. I cancelled out on this by simply pressing Enter.

    Step 3: License the Server

    Now, our Server Core Domain Controller is able to communicate with the network.
    Let’s enter the Windows Product Key for our system to continue to enjoy its bountiful commandline.

    Type the following two commands to license the server with a KMS host:

    start /w slmgr.vbs -ipk YC6KT-GKW9T-YTKYR-T4X34-R7VHC
    start /w slmgr.vbs –ato


    Step 4: Update the Server

    Before we apply Server roles and features to the server, it is essential to update the server with the latest Windows updates.

    The Server Configuration tool (sconfig.cmd) has a menu option to set Windows Update settings and an option to manually update the server. By default the Windows Update settings are set to update manually (the administrator specifies when and what updates to download and when and what updates to install).

    First, let’s enter the Windows Update submenu by pressing 5 and Enter.
    Press A, followed by Enter to set Windows Update to Automatic.
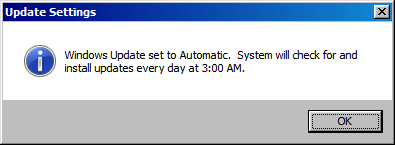
    WUA

    Press OK to acknowledge the change to the Windows Update settings.

    Note:
    If you need more granular control over Windows Update settings, specify these settings with a Group Policies, after you’ve created the domain.


    To manually update the Windows Server now, press 6 and Enter in the Server Configuration Tool. Choose to search for All updates, by pressing A and Enter. After a while, choose to download and install All updates, by (again) pressing A and Enter.

    restart

    After installing the Windows Updates, the box needs a restart. Press Yes to restart.

    Step 5: Install the roles and features 

    We can now turn our Windows Server installation into a functional Server, services clients and employees with meaningful information. For the purpose of this blogpost we’ll transform this vanilla Server Core installation into an Active Directory Domain Controller.

    The Active Directory Domain Services – Domain Controller role in Windows Server 2008 R2, features the Active Directory Gateway Services. This is a web service, that enables the Active Directory PowerShell cmdlets and the use of the Active Directory Administrative Center (remotely). In order to transform the server, we need to install the .Net Framework first with the following two commands:

    dism /online /enable-feature /featurename:NetFx2-ServerCore
    dism /online /enable-feature /featurename:NetFx3-ServerCore

    After installing the .Net Framework, we’re ready to install the binaries for the Active Directory Domain Services – Domain Controller role with the following commandline:

    dism /online /enable-feature /featurename:DirectoryServices-DomainController-ServerFoundation

    Now, all you need to do now to make the server a Domain Controller you’ll need to dcpromo it. Unlike a Full installation of Windows Server, though, the graphical version of the Active Directory installation wizard is not available on a Server Core installation.

    This only presents a minor issue, since we can use dcpromo.exe with an answerfile.
    Simply start up notepad.exe on your Server Core installation and copy,paste the following information into it:

    [DCInstall]
    NewDomain=forest
    NewDomainDNSName=demo.ogd.nl
    ReplicaorNewDomain=domain
    InstallDNS=Yes
    ConfirmGC=Yes
    DatabasePath="C:WindowsNTDS"
    LogPath="C:WindowsNTDS"
    SYSVOLPath="C:WindowsSYSVOL"
    SafeModeAdminPassword=P@ssword 
    RebootonSuccess=Yes


    This will create a Domain Controller for a new domain in a new forest, named demo.ogd.nl. You may change settings according to your environment. To create an answerfile for chilc domain creation, replica domain controller creation, etc. check out Microsoft KnowledgeBase article 947034.

    Save the file as dcpromo.txt and use it in the following commandline:

    dcpromo.exe /unattend:C:usersadministratordcpromo.txt 

    The system will reboot automatically. After this reboot use Notepad to open the log files:

    • C:WindowsDebugDCPromo.log
    • C:WindowsDebugDCPromoUI.log.

      Step 6: Install additional features 

      Your Server Core Domain Controller might benefit from the following Server Features, when you install them. The Active Directory PowerShell commandlets, from my point of view, are essential on a Domain Controller. You might install these with the following two commands:

      dism /online /enable-feature /featurename:MicrosoftWindowsPowerShell
      dism /online /enable-feature /featurename:ActiveDirectory-PowerShell

      While you’re at it, I recommend also installing Windows Backup and its corresponding PowerShell cmdlets:

      dism /online /enable-feature /featurename:WindowsServerBackup
      dism /online /enable-feature /featurename:WindowsServerBackupCommandlet


      These will help you make Active Directory aware backups.

      Step 7: Update the Server  

      With some Server Roles and Features installed, the attack surface of your Server Core installation has dramatically increased. As a best security practice, I recommend updating the server again. Run through step 4 again to make it happen.

      On top of the 28 updates I got previously, I now receive an additional 5 updates.

      Step 8: Run the Best Practices Analyzer 

      With Windows Server 2008 R2 it has become harder to install a sloppy Domain Controller. With its built-in Best Practices Analyzer (BPA) and accompanying BPA rule updates, administrators can compare their Active Directory environments with the Microsoft Best Practices.

      To install the Active Directory Best Practices Analyzer, run the following commands:

      dism /online /enable-feature /featurename:ServerManager-PSH-Cmdlets
      dism /online /enable-feature /featurename:BestPractices-PSH-Cmdlets

      Now you can use Server Manager (servermanager.msc) MMC from a Full Installation of Windows Server 2008 R2 or the Server Manager (servermanager.msc) MMC from the Remote Server Administration Tools (RSAT) on a Windows 7 member workstation to kick-off and review Best Practices.

      However, you can also kick-off and review a Best Practices Analysis from the commandline of your Server Core Domain Controller. To achieve this, run the following commands:

      powershell.exe
      Import-Module ServerManager
      Import-Module BestPractices
      Invoke-BPAModel –BestPracticesModelID Microsoft/Windows/DirectoryServices

      If you want to have the results in a humanly readable format on your Server Core box, ask for the output and export it to either CSV or HTML. In case of HTML, run the following command:

      Get-BpaResult -BestPracticesModelId Microsoft/Windows/DirectoryServices | Where-Object {$_.Severity -eq "Error" -or $_.Severity -eq “Warning” } | ConvertTo-Html -Property Severity,Category,Title,Problem,Impact,Resolution,Help -Title "BPA Report for Active Directory" -Body "BPA Report for Active Directory <HR>" –Head "<title>BPA Report</title><style type=’text/css’> table  { border-collapse: collapse; width: 700px } body   { font-family: Arial } td, th { border-width: 2px; border-style: solid; text-align: left; padding: 2px 4px; border-color: black } th     { background-color: grey } td.Red { color: Red } </style>"  | Out-File "\demo.ogd.nlnetlogonbpa.html"

      This will create a HTML file in the Netlogon folder, where you can pick it up with Windows 7 or Full installation of Windows Server 2008 R2.

      Further reading

      Install an Additional Domain Controller on Server Core R2 
      Active Directory Management with PowerShell in Windows Server 2008 R2  
      Implementing Windows Server Core 2008 R2 Domain Controllers 
      Creating a new Domain Forest on Server Core  
      Installing Active Directory on Server Core with an Answer File   
      Prepare your Domain for the Windows Server 2008 R2 Domain Controller  
      Installing a Read Only Domain Controller on Server Core with an Unattend File  
      How to Install Windows Server 2008 R2 Tutorial Series  
      Hardening guide for Windows 2008 R2 Domain Controller and DNS Server

      Server Core Roles and Features in 2008 R2

       Server Core installations are versatile, secure and highly-optimized installations of Windows Server. Dubbed ‘Windows without Windows’ by some, these installation in Windows Server 2008 R2 are capable of providing more (infrastructural) services than ever! Just like Full installations of Windows Server 2008 R2, depending on the edition of your choice, or budget, the Server Roles and Features installable on a Server Core installation, vary, though.

      The table below shows the individual roles and features in fresh Server Core installations of Windows Server 2008 R2, Web (column 1), Standard (column 2), Enterprise (column 3) and Datacenter (column 4) edition. It also lists the Server Roles features in a fresh installation of the special-purpose Hyper-V server 2008 R2. (column 5):

      red, unavailable     green, available for installation     gray, installed by default

      Server Roles and Features

      W S E D H
      Active Directory Certificate Services          
           Certificate Authority          
      Active Directory Domain Services           
           Active Directory Domain Controller          
      Active Directory Lightweight Domain Services          
      DHCP Server          
      DNS Server          
      File Services            
           File Server          
           Distributed File System          
                DFS Namespaces           
                DFS Replication           
           File Server Resource Manager          
           Services for Network File System          
           Branchcache for network files          
      Hyper-V          
      Print and Document Services           
           Print Server          
           LPD Service          
      Remote Desktop Services           
           Remote Desktop Virtualization Host          
      Web Server (IIS)            
           Web Server          
                Common HTTP features          
                     Static Content          
                     Default Document          
                     Directory Browsing          
                     HTTP Errors           
                     HTTP Redirection          
                     WebDAV Publishing          
                Application Development          
                     ASP.NET          
                     .NET Extensibility           
                     ASP          
                     CGI          
                     ISAPI Extensions          
                     ISAPI Filters          
                     Server Side Includes          
                Health and Diagnostics          
                     HTTP Logging          
                     Logging Tools          
                     Request Monitor          
                     Tracing          
                     Custom Logging          
                     ODBC Logging          
                Security          
                     Basic Authentication          
                     Windows Authentication          
                     Digest Authentication          
                     Client Certificate Mapping Authenti…          
                     IIS Client Certificate Mapping Auth…          
                     URL Authorization          
                     Request Filtering          
                     IP and Domain Restrictions          
                Performance          
                     Static Content Compression          
                     Dynamic Content Compression          
           Management Tools          
                IIS Management Scripts and Tools          
                Management Service          
                IIS 6 Management Compatibility          
                     IIS 6 Metabase Compatibility          
                     IIS 6 WMI Compatibility          
                     IIS 6 Scripting Tools          
           FTP Server          
                FTP Service          
                FTP Extensibility          
           IIS Hostable Web Core          
      .Net Framework 2.0 Features          
      .Net Framework 3.5.1 Features          
           .Net Framework 3.5.1          
           WCF Activation          
                HTTP Activation          
                Non-HTTP Activation          
      Background Intelligent Transfer Service (BITS)          
           Compact Server          
      BitLocker Drive Encryption          
      BranchCache          
      Failover Clustering          
      MultiPath I/O          
      Network Load Balancing          
      Quality Windows Audio Video Experience          
      SNMP Services          
           SNMP Service          
      Subsystem for UNIX-based Application          
      Telnet Client          
      Windows Process Activation Service          
           Process Model          
           .NET Environment          
           Configuration APIs          
      Windows Server Backup Features          
           Windows Server Backup          
           Command-line tools          
      Windows PowerShell          
           Windows PowerShell Cmdlets          
      Windows Server Migration Tools          
      WinRM IIS Extension          
      WINS Server          
      WoW64 Support          
           WoW64          
           WoW64 for .NET Framework 2.0 and Win…          
                WoW64 for .NET Framework 2.0          
                WoW64 for Windows PowerShell          
           WoW64 for .NET Framework 3.0 and 3.5          
           WoW64 for Print Services          
      WoW64 for Failover Clustering          
           WoW64 for Input Method Editor          
           WoW64 for Subsystem for UNIX-based ap…          


      Note:
      While some Server Roles and Features are available in multiple editions of Windows Server, the specific capabilities of the roles may vary between editions.


      Further reading

      Server Core changes in Windows Server 2008 R2
      Server Core Installation Option Getting Started Guide
      Edition Comparison by Server Core Installation Option
      What are the new features in Server Core in Windows Server 2008 R2?
      Windows Server 2008 R2 Server Core – Sconfig and other new features
      Implement Minimalist Solutions using Windows Server 2008 R2 Server Core
      MPIO with Windows 2008 R2 Server Core and iSCSI
      Windows Tips & Tricks UPDATE
      PDC-2008 Managed Development on Windows Server Core 2008 R2 

      Server Core Anytime Upgrades

      Windows Vista had a neat trick up its sleeve, that allowed admins to change the Vista SKU without the need for reinstallation or installation media. One could, for instance, ‘transition’ a Windows Vista Home Basic installation to Windows Vista Home Premium, Business, Ultimate or Enterprise. This functionality is called Windows Anytime Upgrade (WAU)

      Windows 7 and Windows Server 2008 R2 also have this functionality built-in. (Unfortunately Windows Server 2008 does not.)

      So, let’s look how Windows Anytime Upgrades work on Server Core installations of Windows Server 2008 R2.


      Windows Anytime Upgrade FAQ

      So let’s look at Anytime Upgrades a bit deeper:

      Q: Is a Windows Anytime Upgrade the same as an In-place Upgrade?
      A: No. In-place Upgrades can be performed to upgrade a previous version of Windows to a more recent version of Windows. Anytime Upgrades are only possible between the same version of Windows.

      Q: Are Windows Anytime Upgrades possible between architectures, e.g. between x86 and x64?
      A: No. Anytime Upgrades are only possible between SKUs of the same architecture.

      Q: Do I need to download a Windows Update for Windows Anytime Upgrades?
      A: No you don’t. The only network communication is for Windows activation.

      Q: Can I revert back after a successful Windows Anytime Upgrade?
      A: No, Windows Anytime Upgrades are one-way processes.

      Q: Can I perform Windows Anytime Upgrades in Windows Server 2008?
      A: No. This feature is not available in Windows Server 2008.

      Q: How much time does a typical Windows Anytime Upgrade take?
      A: Most of the time will be taken up by the two system restarts.The rest of the process would normally take a couple of (Microsoft) minutes.

      Q: Can the server be a Domain Controller?
      A: No, the server cannot be a Domain Controller or Certificate Authority at the time of Windows Anytime Upgrade.

      Q: Can I use Windows Anytime Upgrade to change between (OEM, MAK, KMS) productkeys?
      A: No, if you want to change the licensing channel, use the slmgr.vbs tool   


      Windows Anytime Upgrade paths

      The first thing to look at is the Windows Anytime Upgrade paths available, based on the installed Windows Server SKU. The table below shows these paths for the available Server Core flavors of Windows Server 2008 R2:

      Source Windows Server 2008 R2 SKU Target Windows Server 2008 R2 SKU
      Windows Server 2008 R2 Standard x64
      "ServerStandard"
      Windows Server 2008 R2 Enterprise x64
      "ServerEnterprise"
      Windows Server 2008 R2 Datacenter x64
      "ServerDatacenter"
      Windows Server 2008 R2 Enterprise x64
      "ServerEnteprise"
      Windows Server 2008 R2 Datacenter x64
      "ServerDatacenter"


      Windows Anytime Upgrade commands

      To Anytime Upgrade a Server Core installation of Windows Server 2008 R2, use the following commands.

      First, determine the SKU your Server Core installation is running. Use the following command:

      dism.exe /online /Get-CurrentEdition


      Then, you’re ready to check for possible target SKUs. Run:

      dism.exe /online /Get-TargetEditions


      Finally, to initiate an upgrade, run:

      dism.exe /online /Set-Edition:Edition /ProductKey:ProductKey


      Where Edition can be ServerDatacenter or ServerEnterprise and ProductKey is the 25-digit productkey, notated with dashes. For instance: ABCDE-FGHIJ-KLMNO-PQRST-UVWXY.


      Windows Anytime Upgrade Benefits

      After you perform a Windows Anytime Upgrade, you reap the following benefits:

      • Enterprise Edition and Datacenter Edition offer the Failover Clustering feature.
        When you’re looking to convert a Standard Edition installation into a cluster, however, the Anytime Upgrade feature is for you. Check, however, whether the application, role or feature can handle an Anytime Upgrade.
      • Enterprise Edition and Datacenter Edition offer more flexible ways to license virtual machines running on the installation. Standard Edition allows for one virtual licensed Windows installation. Enterprise Edition allows for up to four virtual licensed Windows Installations. Datacenter allows for unlimited virtual licensed Windows Installations.


      Concluding

      Windows Anytime Upgrades can be useful for Windows Server installations to reap the benefits of an upscale SKU. For Server Core installations, these benefits aren’t really big.

      One day, perhaps, the Anytime Upgrade functionality will be of major importance to Server Core installations. This might be the day when Anytime Upgrades can be used to switch from Server Core installations to Full installations and vice versa.

      How to get going with PowerShell in Server Core R2

      Server Core installations of Windows Server 2008 R2 and installations of Hyper-V Server 2008 R2 offer Windows PowerShell. A lot has been written on the geekiness of PowerShell, how it wasn’t included in Server Core installations of Windows Server 2008 R2 and how you could enable it anyway. The question however is, how do you get started with using PowerShell in Server Core?

      This blogpost shows you how to install PowerShell, how to start it up and issue some basic commands.

      Installing PowerShell

      To install Windows Powershell on a Server Core installation of Windows Server 2008 R2, issue the following three commands:

      dism /online /enable-feature /featurename:NetFx2-ServerCore
      dism /online /enable-feature /featurename:MicrosoftWindowsPowerShell
      dism /online /enable-feature /featurename:ServerManager-PSH-Cmdlets

      These commands will install the .Net Framework 2.0 binaries. This is a package, Windows PowerShell depends on. After you’ve successfully installed the .Net Framework you can install Windows PowerShell. Use the last command to be able to use the built-in PowerShell cmdlets for Server Manager.

      Note:
      The above commands are case sensitive.


      If you also need 32bit support in Windows Powershell, also issue the following two (again: case sensitive) commands:

      dism /online /enable-feature /featurename:NetFx2-ServerCore-WOW64
      dism /online /enable-feature /featurename:MicrosoftWindowsPowerShell-WOW64

      Tip!
      You don’t need to install the base Windows on Windows (WoW) 64 package into a Server Core installation of Windows Server 2008 R2. This package is installed by default.


      Starting PowerShell

      To start using PowerShell you need to start it up. For some strange reason the path where PowerShell resides is not added to the %PATH% variable after installing, so you need to drill down to it, before you can start PowerShell.

      Use the following commands:

      cd C:Windowssystem32WindowsPowerShellv1.0
      powershell


      Now PowerShell is started. (Congratulations!)

      Showing off PowerShell

      One of the strongest examples of the strength of PowerShell is the ability to add and remove Server Roles and Server Features, without the need to worry whether you’re typing them right. (remember, the dism.exe command is case-sensitive)

      for instance, on the PowerShell you can use the following command to install the Windows on Windows (WoW) 64 support for .Net Framework 2.0:

      PS > enable-windowsfeature netFX2-ServerCore-WoW64


      Also, one of the nice benefit of using the get-windowsfeature PowerShell cmdlet is you get the hierarchy, instead of the long list of Server Roles and Features you get when you use dism /online /get-features. See for yourselves, when you execute the following command:

      PS > import-module ServerManager
      PS > get-windowsfeature


      Further reading

      Windows Server Core: Overview
      Learning Windows Server 2008 R2 – Server Core…
      Windows Server 2008 R2 Rocks!
      How to enable PowerShell in Hyper-V Server 2008 R2
      Setup Core Configurator on Windows Server 2008 R2
      Using PowerShell on Windows Server 2008 R2 Server Core
      Has Microsoft redeemed itself?