Windows Server 2012

Definitive list of Windows Server installations without GUIs

Datacenter

‘Server Core’ has been around for quite a while. Roughly for as long as this domain exists (registered on January 19, 2008, while Windows Server 2008 was released on February 4, 2008).


About Server Core

Server Core is a significantly scaled-back installation and/or run type for Windows Server where no Windows Explorer shell is installed. All configuration and maintenance is done entirely through command-line interface windows, or by connecting to the machine remotely using Microsoft Management Console. However, Notepad and some control panel applets, such as Regional Settings, are available.

Microsoft’s primary motivation for producing a Server Core variant of Windows Server was to reduce the attack surface of the operating system.


List of Windows Server versions

A question I get regularly is which Windows Server versions can be run without Graphical User Interface, which Windows Server versions come without a GUI and which Windows Server offer the Server Core installation option.

The list below serves as the definitive list of released Windows Server versions.
It will be updated when Microsoft releases new versions of Windows Server.

Windows Server 2008

Released: February 4, 2008
Server Core: Installation option

Windows Server 2008 was the first version of Windows Server 2008, where the Server Core installation option could be chosen. Server Core was not the default installation option. Server Core installations of Windows Server 2008 do not offer .NET or PowerShell, but do offer the pre-release version of Hyper-V out of the box.

Hyper-V Server 2008

Released: December 30, 2008
Server Core: Only

Hyper-V Server 2008 was the first release of Microsoft’s purpose-built Hypervisor installation version. It is unavailable with a GUI and most Server Roles cannot be installed or configured. To facilitate configuring Hyper-V Server, it came with hvconfig.cmd, hvconfig.vbs and WUA_SearchDownloadInstall.vbs.

Windows Server 2008 R2

Released: October 22, 2009
Server Core: Installation option

Windows Server 2008 R2 added .NET and Windows PowerShell to the Server Core installation option.

Hyper-V Server 2008 R2

Released: October 22, 2009
Server Core: Only

Hyper-V Server 2008 R2 was introduced alongside Windows Server 2008 R2.

Windows Server 2012

Released: October 30, 2012
Server Core: Default installation option, switchable

Windows Server 2012 did away with the Enterprise edition of Windows Server. However, it added the ability to add and remove the GUI layers in full installations of Windows Server to get to a Server Core installation from an attack surface point of view.

Server Core installation of Windows Server 2012 were the first installations that featured sconfig.cmd, a derivative of Hyper-V Server’s hvconfig.cmd.

Hyper-V Server 2012

Released: October 30, 2012
Server Core: Only

Hyper-V Server 2012 is a logical upgrade to Hyper-V Server 2008 R2.

Windows Server 2012 R2

Released: November 25, 2013
Server Core: Default installation option, switchable

Windows Server 2012 R2 introduced several new roles, including the new Web Application Proxy role, that are perfectly suitable to be outfitted as Server Core installations. This is the last version where the GUI layers can be removed and added.

Hyper-V Server 2012 R2

Released: November 25, 2013
Server Core: Only

Hyper-V Server 2012 R2 is the purpose-built version of Windows Server for Hyper-V.

Windows Server 2016

Released: October 15, 2016
Server Core: Default installation option

Windows Server 2016 removed the ability to add and remove the GUI layers. If Server Core is needed, it needs to be installed as Server Core installation. In this version, ‘Full installation’ is remarketed as ‘Windows Server with Desktop Experience’.

Windows Server 2016 is the first Long Term Servicing Channel (LTSC) release in Microsoft’s new release schedule for Windows Server.

Hyper-V Server 2016

Released: October 15, 2016
Server Core: Only

Windows Server, version 1803

Released: April 30, 2018
Server Core: Only

Windows Server version 1803 was the first semi-annual (SAC) release of Windows Server. Semi-annual releases are available as Server Core, only. Windows Server version 1803 focused on making container technology available to organizations.

Windows Server, version 1809

Released: November 13, 2018
Server Core: Only

Windows Server version 19809 is a semi-annual release of Windows Server as Server Core only. Its release coincided with the release of Windows Server 2019, but offered many skip-ahead features.

Windows Server 2019

Released: November 13, 2018 (December 2018)
Server Core: Default installation option

After being announced at Ignite 2018 in Orlando, Microsoft released Windows Server 2019 on November 23, 2018. It was released for two short days, until reported problems lead to the conclusion at Microsoft that the quality of the Operating Systems was sub-par. It was rereleased in December 2018 and features Features on Demand for application compatibility.

Windows Server, version 1903

Released: May 21, 2019
Server Core: Only

Windows Server version 1903 is a semi-annual release of Windows Server as Server Core only.

Hyper-V Server 2019

Released: November 13, 2018 (June 2019)
Server Core: Only

After many months of delays, Hyper-V Server 2019 was released in June 2019.


Further reading

Windows Server release information

Server Roles in Windows Server 2012 Server Core

WebYou might be interested in working with the available Server Roles in Server Core installations of Windows Server 2012.
While you can always install Windows Server 2012 as a Full Installation, you will not gain all the benefits of having it installed as a Server Core installations. Among other things, the sources to pile on the Graphical User Interface (GUI) are still present on a previously converted installation. That’s why I wrote a series on implementing and managing Server Roles on Server Core installations of Windows Server 2012, natively.

I’ve posted this series on 4sysops.com, the free resource for Windows Administrators. You can find all 12 posts through the links below:

  1. Looking at available Server Roles in Windows Server 2012 Server Core
  2. Configuring a Windows Server 2012 Server Core installation as an Active Directory Domain Controller
  3. Configuring a Windows Server 2012 Server Core installation as a DNS Server
  4. Configuring a Windows Server 2012 Server Core installation as a DHCP Server
  5. Configuring a Windows Server 2012 Server Core installation as a File Server
  6. Configuring a Windows Server 2012 Server Core installation with Active Directory Certificate Services 
  7. Configuring a Windows Server 2012 Server Core installation as a Print Server
  8. Configuring a Windows Server 2012 Server Core installation as a Remote Access Server with RRAS, DirectAccess and Routing
  9. Configuring a Windows Server 2012 Server Core installation as a Hyper-V Host
  10. Configuring a Windows Server 2012 Server Core installation as a Web Server
  11. Configuring a Windows Server 2012 Server Core installation as a FTP Server
  12. Configuring a Windows Server 2012 Server Core installation as a Windows Server Update Server (WSUS)

Enjoy! Smile

KnowledgeBase: Server Core Web Servers are not manageable remotely by default

Pre-Web-iconIn Windows Server 2012 and Windows 8, Server Manager can be used to remotely manage both Full Installations and Server Core Installations of Windows Server 2012.

Tip!
To gain access to the Server Manager functionality in Windows 8, install the Remote Server Administration Tools package. Next, you can use the Start Screen to search for the Administrative Tools folder. You will find a shortcut to Server Manager in this folder.


One of its features is the ability to install and uninstall Server Roles and Features remotely. This is extremely helpful in scenarios where you’d want to install multiple servers with the same Server Role at once (like the Web Server Role), but also when you’re managing Server Core installations, since Server Manager provides a graphical user interface (GUI) to make you easily achieve a lot of your configuration tasks.


The challenge

Many of the Server Roles available in Server Core can be installed and configured remotely. I know many admins like to use Server Manager and the Remote Server Administration Tools to manage their Server Core installations that way. Therefore, I find it a shame, that the Web Server Role cannot be installed to a basic configured state using the above method. Sad smile 

The Web Server Server Role can be installed on its own, but it is also installed when you install one of the next Server Roles in Windows Server 2012:

  1. FTP Server
  2. DirectAccess Server
  3. IP Routing
  4. Windows Server Update Services

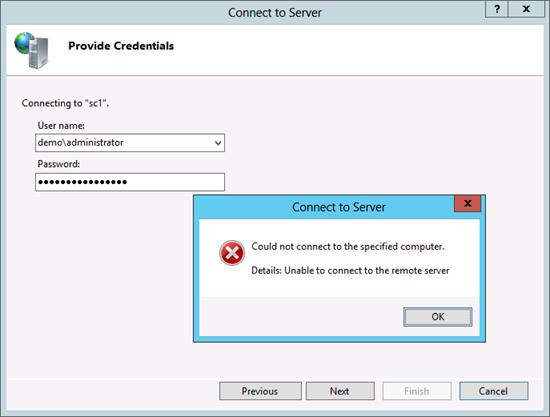
When you try to connect with the Internet Information Services (IIS) Manager from a remote Windows Server 2012 installation, after you install the Web Server Role or any of the Server Roles above, you will be presented with an error message:

IISMgrUnableToConnect

The explanation

The root of the problem is, by default, when you install the Web Server Server Role on Server Core, the Web Management Service Role Service is not installed by default.

Security, Part 1

The reason Microsoft does not install the Web Management Service is this would mean a setback from a security perspective to the Windows 2000 Server days (where Internet Information Services were installed and enabled by default on each install). To be frank, not all Web Servers need a remote web management service, listening on management requests. Indeed, with access to the console, the many Internet Information Services-related PowerShell Cmdlets and, of course, the Web Platform Installer, remote management isn’t always needed.


To make things worse, even if you pay attention during the installation of the above Server Roles, you still wouldn’t be able to manage Web Servers remotely with the Internet Information Services (IIS) Manager, since the Web Management Service is not configured or started, by default.

Security, Part 2

Although the Web Management relies on authentication to be accessible and the communication between the Internet Information Services (IIS) Manager is encrypted (optionally), opening a management service listening on a TCP port is a bad idea for publicly connected machines. Therefore, the Web Management Service, by default, is not configured for remote management and its service is not running after installation.


This configuration can be done … wait for it… through the registry. Confused smile

You can perform these changes through Group Policy Preferences (for domain-joined Web Servers, FTP Servers, WSUS Servers, DirectAccess Servers and IP routers. Alternatively, you can use Remote Registry access or script the change with *.reg files through PSExec. Regedit.exe, however, is available on the command line of Server Core installation, so you can make this change on the console itself.

Of course, after a change, the Web Management Service (WMSVC) needs to be configured to start automatically and, then, started.


The solution

So, to manage a Web Server remotely, you will need to perform the following actions:

  1. Install the Web Management Service Role
  2. Configure the Web Management Service
  3. Configure the Web Management Service to start automatically
  4. Start the Web Management Service

Install the Web Management Service Role

Install the Web Management Service Role on your Server Core installation by either installing it through Server Manager on a Full Installation of Windows Server 2012.

To install the Web Management Service from the console of your Server Core installation, run the following PowerShell command:

Install-WindowsFeature Web-Mgmt-Service


Configure the Web Management Service

The Web Management Service can be configured through the Registry. Its settings are located in HKLMSoftwareMicrosoftWebManagementServer.

Simply start the Registry Editor on the console of your Server Core installation by typing regedit.exe, and change he value for EnableRemoteManagement from 0 to 1. Close RegEdit with Alt+F4 or by clicking the X symbol in the right top of the program.

Configure the Web Management Service to start automatically

Next, configure the Web Management Service for automatic start. Type the following command on the console of your Server Core installation:

sc config WMSVC start= auto


Start the Web Management Service

All we need to do now, is start the Web Management Service:

net start WMSVC


Concluding

Microsoft has gone to great lengths to make the Web Server as secure as possible. When you remotely manage Server Core-based Web Servers, however, you will hit some bumps on the way. This blogpost explains how to pass them

Tip! Get-DisplayResolution and Set-DisplayResolution also work on Full installations of Windows Server 2012

Computer ScreenA quick look at the Windows PowerShell support for Windows Server 2012 page on TechNet reveals two PowerShell Cmdlet gems for Server Core installations:

These two PowerShell Cmdlets fill a huge gap many Server Core administrators faced in the Windows Server 2008 and Windows Server 2008 R2 timeframes. With these two cmdlets, it’s easy to change the display resolution (or screen resolution) on Server Core installations.

Although the page on TechNet suggests otherwise, these two PowerShell Cmdlets are not just limited to Server Core installations of Windows Server 2012: They also work on Full Installations of Windows Server 2012.

This presents an interesting opportunity, because one of Windows Server 2012’s system requirements is a 1024 x 768 display. Yet, with Set-DisplayResolution I can configure a 800×600 display resolution. Despite what you might expext, when configured with a 800×600, Windows Server 2012 will still display the Start Screen…


I use Set-DisplayResolution a lot for demos. One of my laptops has a 1366×768 display and virtual machines running within Hyper-V, aren’t able to show their entire screen. Changing the display resolution with Set-DisplayResolution on my virtualized Windows Server 2012 installations, makes their screens sit neatly above the Task Bar.

Thanks, Microsoft!

I posted a series on 4SysOps

I would like to point those looking at Server Core in Windows Server 2012, to 4SysOps.

I’ve posted a series there:


Enjoy! 🙂

Tip! Use the Windows Server 2012 Server Core Evaluation

Internal-Clear-HardDiskAlthough installing a Server Core installation takes significantly less time than installing a Server with a GUI, there is an even faster way to get started with Server Core, especially when the Product Key screen during installation or the download speed at your location are slowing you down.


Microsoft has made a pre-configured virtual hard disk (VHD) available, that enables you to evaluate Microsoft Windows Server 2012, Standard Edition in Server Core trim.

The two downloads, making up the evaluation, are 2GB in size together, which is even less than the download size of the Windows Server 2012 DVD…

After you’ve downloaded (, converted) and imported the virtual hard disk, you will need to create/assign a virtual network interface card (NIC) to the newly created virtual machines that has Internet access. This is a requirement to active the OS. You will have 10 days to activate this image, after which you will have 180 days of unlimited use. Once activated, you are no longer required to be connected to the Internet.

Download Windows Server 2012 Standard x64 Core EVAL

Happy evaluating!

How to disable the Windows Firewall on Server Core installations of Windows Server 2012 and Hyper-V Server 2012

FirewallFrom the first Server Core installations of Windows Server 2008 to my latest installation of Hyper-V Server 2012, I have struggled with the Windows Firewall. It is turned on by default after installation and this is a good thing. However, when you’re testing remotely managing Server Core installations of Windows Server 2012 and Hyper-V Server 2012, the Windows Firewall gets in the way fast.

As it turns out, the Windows Firewall can be turned off quite easily. Two methods exist:

  1. Disable the Windows Firewall from the command line
  2. Disable the Windows Firewall through Group Policy

Disabling from the command line

If you want to disable the Windows Firewall from the command line for a single server, PowerShell is the fastest and most reliable method. The following PowerShell one-liner will disable the Windows Firewall for all Firewall profiles:

Get-NetFirewallProfile | Set-NetFirewallProfile -enabled false


Disabling through Group Policy

Group Policy can be used to change settings on thousands of computers at once. To disable the Windows Firewall through Group Policy, follow these instructions:

  • Log on to a Domain Controller, or a management station that has the Group Policy Management Console (GPMC) installed with sufficient permissions to create and link Group Policy objects. (GPOs)
  • Start the Group Policy Management Console (GPMC)
  • Select an appropriate level where you want to apply the Group Policy Object (GPO), for instance the domain-level or an Organizational Unit (OU) and right-click it. Select Create a GPO in this domain, and Link it here… from the context menu. Give it a meaningful name and press OK when done.
  • Now select the newly created Group Policy Object (GPO) and right-click it. Select Edit… from the context menu. This will open the Group Policy Management Editor.
  • Open Computer Configuration, Policies, Windows Settings, Security Settings, Windows Firewall with advanced security. Here, open Windows Firewall with advanced security. In the right-hand pane, click on the hyperlink Windows Firewall Properties.  
  • Here, the tabs represent the Firewall profiles: domain, private and public. You can select the Firewall state for each of these profiles.
  • When done, click OK. Then, close the Group Policy Management Editor.

After the default background refresh has occurred, the firewall will be disabled on all computers in the scope of the Group Policy Object (GPO). If you don’t want to wait that long, you can run gpupdate on the computers you want to, or (when you’re using the Group Policy Management Console on Windows 8 or Windows Server 2012) you can right-click on the level where you applied the Group Policy Object (GPO) and select Group Policy Update… from the context-menu.

Upgrading a Windows Server 2008 R2-based Server Core Domain Controller or DNS Server to Windows Server 2012 hangs on blank screen

Server Core installations of Windows Server offer increased performance and higher availability, compared to their Full Installation and Minimal Shell couterparts. Once you get hooked on the idea of Server Core and have a couple of Server Core installations of Windows Server 2008 R2 running, you might even get the idea you can simply in-place upgrade them to Windows Server 2012.

In an ideal world you can, but unfortunately, due to a known issue, you cannot upgrade a domain controller that runs a Server Core installation of Windows Server 2008 R2 to a Server Core installation of Windows Server 2012. The issue is described in Microsoft Knowledgebase article 2734222.

The upgrade will hang on a solid black screen late in the upgrade process. Rebooting such DCs exposes an option in boot.ini file to roll back to the previous operating system version. An additional reboot triggers the automatic rollback to the previous operating system version.

Until a solution is available, it is recommended that you install a new domain controller running a Server Core installation of Windows Server 2012 instead of in-place upgrading an existing domain controller that runs a Server Core installation of Windows Server 2008 R2. Another option is to demote the Server Core installation and remove the DNS Server role. Then, you can successfully in-place upgrade the server, re-apply the DNS Server Role and promote the server again, but really… is that less work?

When a solution comes available, you’ll be the first to know.

KnowledgeBase: Errors connecting to Windows Server 2008 R2 or Windows Server 2012 Device Manager remotely

Last week, Microsoft has released a KnowledgeBase article titled Errors connecting to Windows Server 2008 R2 or Windows Server 2012 Device Manager remotely.

In this article, Microsoft tells us the reason why we can’t connect remotely to:

  • Windows Server 2012 Device Manager from a Windows 8-based computer
  • Windows Server 2012 Device Manager from a Windows 7-based computer
  • Windows Server 2008 R2 Device Manager from a Windows 8-based computer
  • Windows 8 Device Manager from a Windows 7-based computer

The reason behind this, is the fact that Remote access to the Plug and Play (PNP) RPC interface has been removed in Windows 8 and Windows Server 2012.

As a resolution, Microsoft suggests to login to the computer locally to utilize Device Manager.

While this sounds like some sort of workaround for Full Installations, on Server Core installations of Windows Server 2012, this won’t be possible, since devmgmt.msc is not a recognized command.

The work-around for Server Core installations is to install the Windows Server Management Infrastructure role. Use the following command line to perform this action:

Install-WindowsFeature Server-Gui-Mgmt-Infra –Restart


Related KnowledgeBase articles

2781106 Errors connecting to Windows Server 2008 R2 or Windows Server 2012 Device Manager remotely

KnowledgeBase: Unable to convert to Server with a GUI from Server Core on an upgraded Windows Server 2012 machine

pilebooksMicrosoft has released KnowledgeBase article 2775484, that describes a situation, where you’re unable to convert an upgraded Windows Server 2012 Full Installation to Server Core and back.

The situation

You upgrade a full installation of Windows Server 2008 x64 or Windows Server 2008 R2 to Windows Server 2012 and choose the option “Server with a GUI”.

After the upgrade you convert the Server with a GUI installation to Server Core.
In this scenario, if you try to convert back to Server with a GUI, the operation may fail and rollback to Server Core.

The cause

This problem occurs, because of three registry entires from Windows Server 2008 or Windows Server 2008 R2 being retained during the upgrade:

These three registry entries exist in

HKLMSOFTWAREMicrosoftWindowsCurrentVersionWINEVTPublishers


And are named:

  • {bc2eeeec-b77a-4a52-b6a4-dffb1b1370cb}
  • {57e0b31d-de8c-4181-bcd1-f70e880b49fc}
  • {8c9dd1ad-e6e5-4b07-b455-684a9d879900}

The resolution

To be able to convert the Windows Server 2012 installation, these registry keys need to be removed.

You can perform these actions with RegEdit.ex, but, alternatively, you can start NotePad, paste the following three commands, save the file as a .bat file and then run it from an elevated command prompt:

reg delete HKLMSOFTWAREMicrosoftWindowsCurrentVersionWINEVTPublishers{bc2eeeec-b77a-4a52-b6a4-dffb1b1370cb}

reg delete HKLMSOFTWAREMicrosoftWindowsCurrentVersionWINEVTPublishers{57e0b31d-de8c-4181-bcd1-f70e880b49fc}

reg delete HKLMSOFTWAREMicrosoftWindowsCurrentVersionWINEVTPublishers{8c9dd1ad-e6e5-4b07-b455-684a9d879900}


After you restart the machine you will be able to convert the machine to a “Server with a GUI”.